Jul 28, 2023
Understanding Homelabs
A homelab for cybersecurity is essentially a mini-laboratory that you set up at home or any personal space. Imagine it like your very own sandbox where you can freely experiment, learn, and play with different cybersecurity concepts and technologies, all without causing any real-world damage or risks.
It typically includes a collection of hardware and software, such as computers, servers, and networking equipment, which are configured to simulate real-world IT environments. This allows you to practice and hone your cybersecurity skills in a safe, controlled environment.
For example, you can simulate network attacks using tools on one system, while working on detecting and defending against these attacks on another. By doing so, you get hands-on experience with various cybersecurity practices, including threat detection, system hardening, and incident response.
Setting up a homelab can be a rewarding experience, providing you with practical knowledge that goes beyond what you can learn from textbooks or online courses.
Learning Outcomes
This walkthrough will equip you with practical skills to build a cybersecurity homelab. You'll learn to set up a host PC, use VMware and pfSense for secure network simulations, apply Security Onion for threat detection, and prepare Kali Linux for attack simulations. You'll also gain experience in configuring Windows systems and using Splunk, as well as integrating various Linux machines for diverse cybersecurity scenarios. I will be following along with cyberwox and cybermentor's walkthroughs for this homelab.
Content
Building the Host PC
Setting up VMware Workstation for Hypervisor Duties
Configuring pfSense Firewall for Enhanced Network Segmentation and Security
Setting up Security Onion as a Comprehensive IDS, Security Monitoring, and Log Management Solution
Preparing Kali Linux for Attack Simulations
Setting up a Windows Server to Function as a Domain Controller
Configuring Windows-Based Desktops
Configuring Splunk on Ubuntu Server
Installing a Universal Forwarder
Building The Host PC
This is my personal build that i'll be using for demonstration purposes
NZXT H510 Elite Build
NZXT H510 Elite (White)
NZXT Kraken X63
ASROCK Z490 TAICHI
Nvidia GeForce RTX™ 3090 Founder's Edition
Intel Core i9-10850K 10-Core 3.6GHz
EVGA SuperNOVA 1000W G5 Gold
Team T-FORCE XTREEM ARGB 4000MHz 4000 MHz (max speed) 64GB (4 X 16 GB) More Info
Intel 665p (2.0 TB) (2)
NZXT RGB Cable Comb
NZXT RGB Lighting Kit
NZXT USB Expansion
Cablemod 6+2 PIN Basic Cable Extension Kit (White)
Standard
Windows 10 Pro
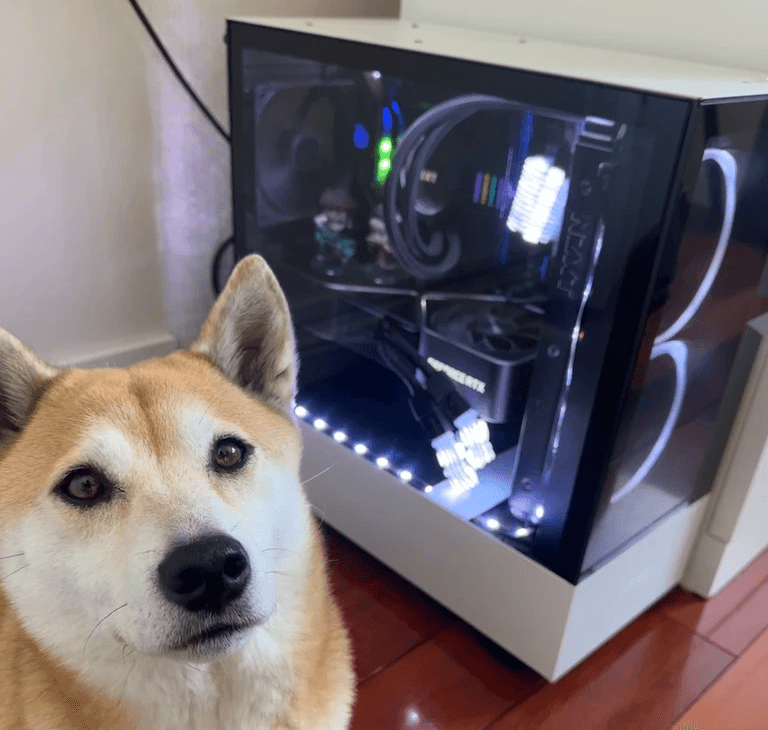
For this module, you'll need a computer with a minimum of 16GB of RAM to effectively run multiple virtual machines simultaneously. Also, ensure you have ample storage space for the software installations and data generated during the lab activities. Having a reliable internet connection is beneficial for accessing online resources and updates. Prior knowledge of basic network and system operations is recommended, but not mandatory. Please note that the specifications may vary depending on the complexity of the scenarios you wish to simulate in your homelab.
If you are unsure whether or not your build is suitable, the best approach may be to start with what you have first. As you encounter needs or desires, you can respond by halting non-essential activities or upgrading your setup, depending on where you find limitations.
If you're working within a specific budget or need certain hardware, there are many ways to set up your lab. Check out https://pcpartpicker.com/list/. It's great for comparing parts and prices across different retailers. You can also get ideas from custom builds shared by other users. This could help you plan your lab setup.
Using a dedicated or repurposed machine is ideal for running virtual machines separately. For such a setup, prioritize upgrades to the CPU, RAM, and hard drive.
It's important to use a separate setup for your lab, one that doesn't hold any critical data like personal files or sensitive information. This setup will serve as your experimental playground.
Setting up VMware Workstation for Hypervisor Duties
Virtual machines can be thought of as individual computers housed within your own computer. They are indispensable in the realm of cybersecurity, providing a safe space for testing and experimentation, thereby shielding your main system from potential harm.
For this walkthrough, we will primarily be using VMware on Windows. However, VirtualBox and Proxmox serve as excellent alternatives. VirtualBox is particularly beginner-friendly with its intuitive interface, while Proxmox offers a suite of advanced features, making it ideal for setting up more complex network simulations. All of these tools play a key role in creating a cybersecurity lab for practical learning and exploration.
Download VMware: Get VMware Workstation from their website. (We can use the free version)
Navigate to the VMware Download Center.
Locate VMware Workstation Player under Desktop & End user Computing.
Select the installer from the list according to your host operating system.
Click Download.
Run Installer: Open the downloaded file.
Follow Steps: Go through the setup wizard, clicking "Next" after each step.
Agree to License: Accept the terms of the License Agreement.
Setup Type: Select "Typical" setup.
Choose Preferences: Decide on updates and improvement program participation.
Shortcut: Choose whether to create a desktop shortcut.
Install: Click "Install" and wait for it to finish.
Finish and Restart: Click "Finish" and restart your computer if necessary.
Open VMware: Launch VMware from desktop or Start Menu.
Configuring pfSense Firewall for Enhanced Network Segmentation and Security
In our cybersecurity homelab, we rely on pfSense, an open-source firewall and router software. Its first crucial function is network segmentation, which separates our virtual machines into different network zones, mirroring a realistic network scenario. Secondly, pfSense enhances our lab's security by inspecting network traffic and blocking any potential threats, safeguarding our learning environment. Furthermore, the hands-on experience we acquire in managing network security through pfSense is invaluable for any cybersecurity practitioner. Overall, in this lab, pfSense will be an integral tool, assisting in effectively managing and securing our virtual network.
Download pfSense: Visit the pfSense website and download the latest version of pfSense.
Navigate to the pfSense Download section.
Choose your architecture, select ISO installer, find the closest mirror, and click download.
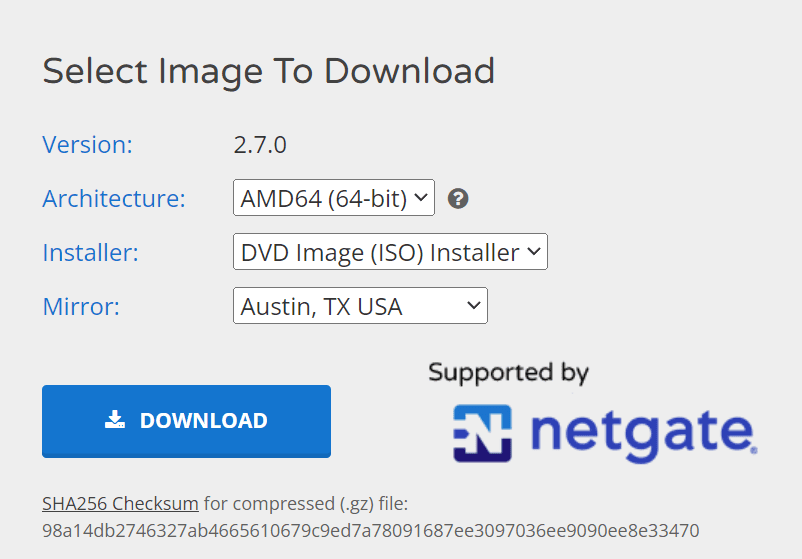
Install pfSense on a Virtual Machine: Create a new virtual machine in your hypervisor (VMware, VirtualBox, etc.), and install pfSense.
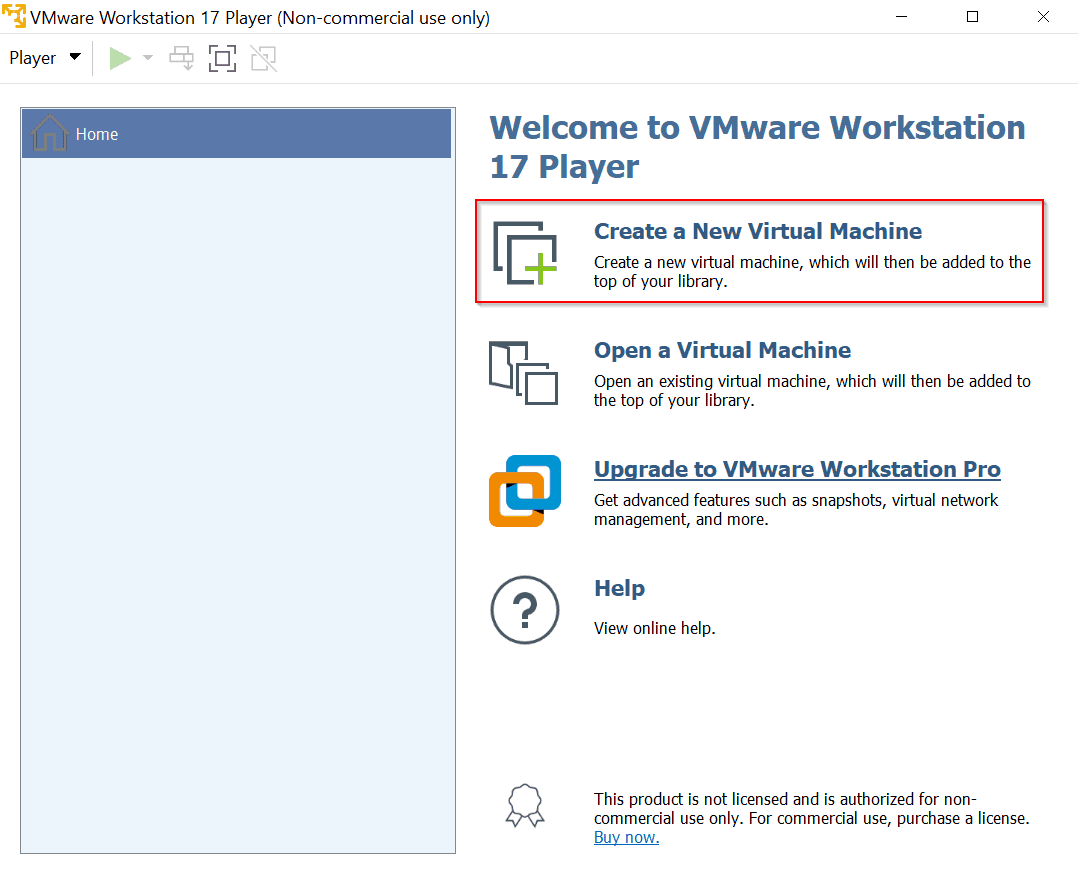
Launch VMware Workstation Player
Select Create a New Virtual Machine
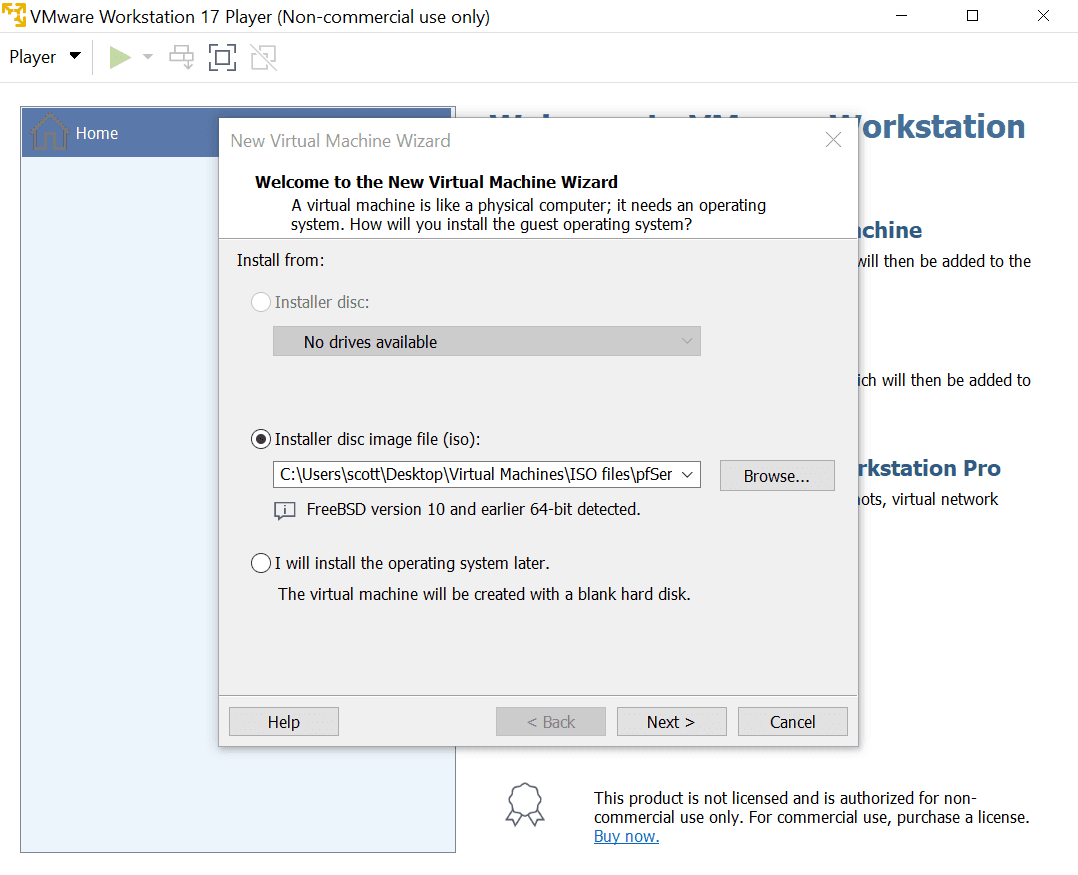
Select the path to your pfSense ISO image by clicking Browse, then click Next.
Rename Virtual Machine Name to pfSense, then click Next.
Leave Maximum Disc Size at 20GB, and Split Virtual Disks into multiple files. Click Next.
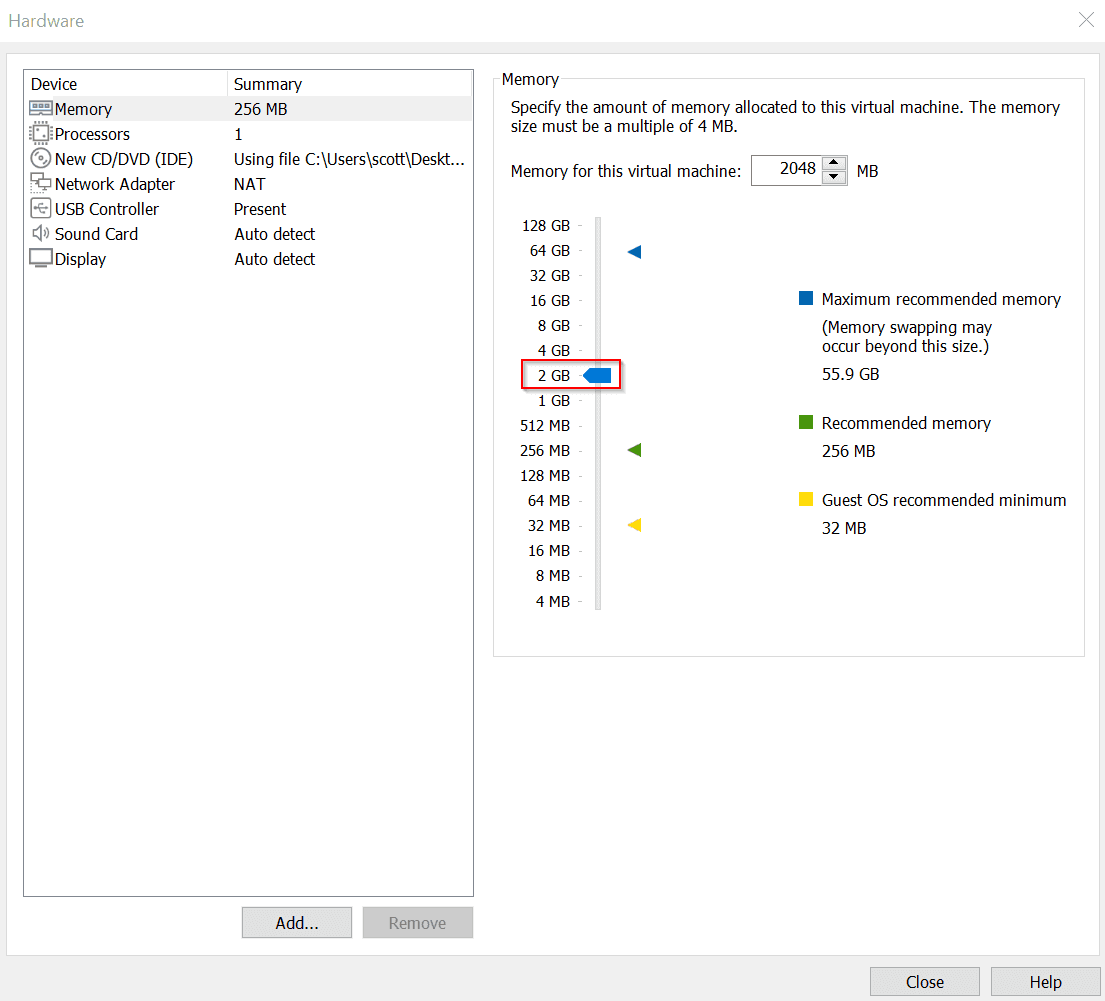
Select 2GB of RAM
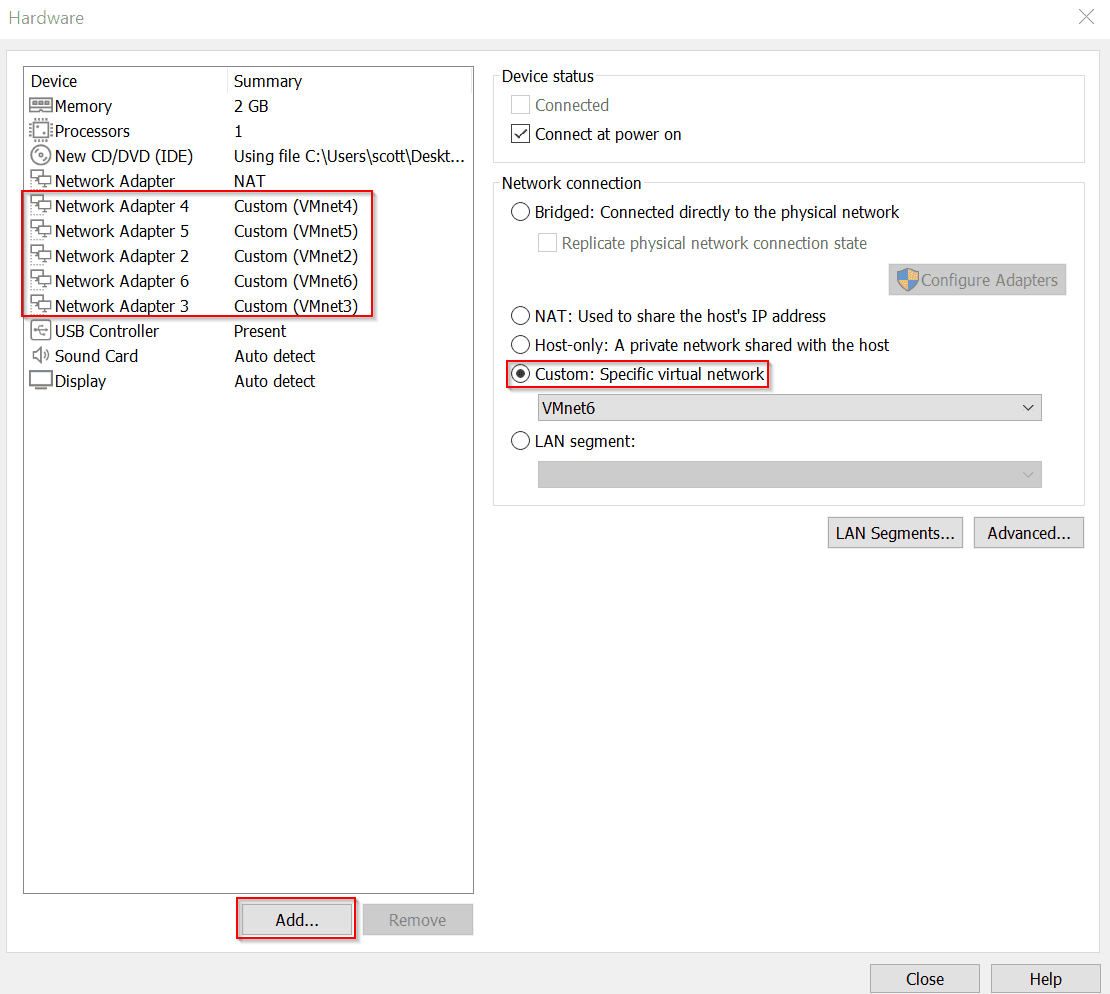
Click on Add to add 5 more Network Adapters to support the other Virtual Machines for this Lab. Then, under Network Connection, click Custom and assign each specific virtual network with each of the new Network Adapters in the dropdown to their respective networks. Once finished, click Close.
Click Finish.
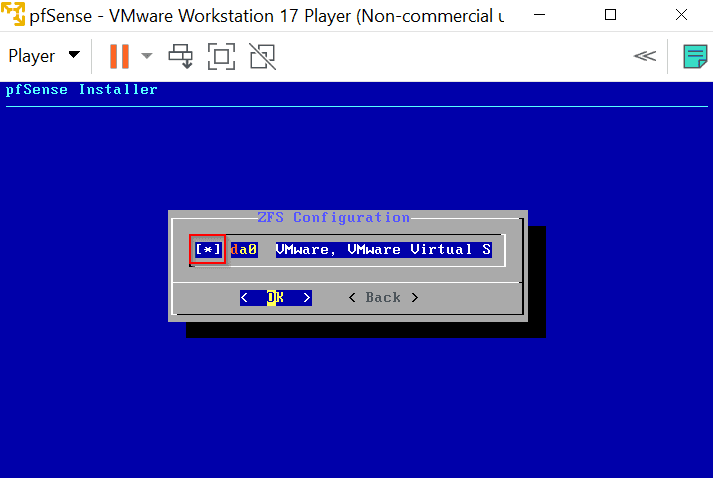
Follow the instructions and hit enter for all default settings. When you get to ZFS Configuration hit the Space Bar to choose the partition and the * will appear. Hit enter to proceed.
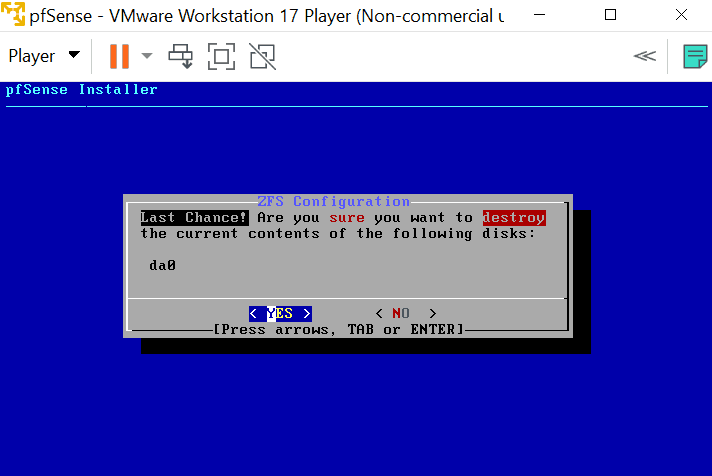
Hit enter to proceed.
After the installation is finished, click on Reboot.
Set Up WAN and LAN: During the installation, set up your WAN (Wide Area Network) and LAN (Local Area Network) interfaces according to your network architecture.
Enter 1 to assign interfaces. Enter n for VLAN.
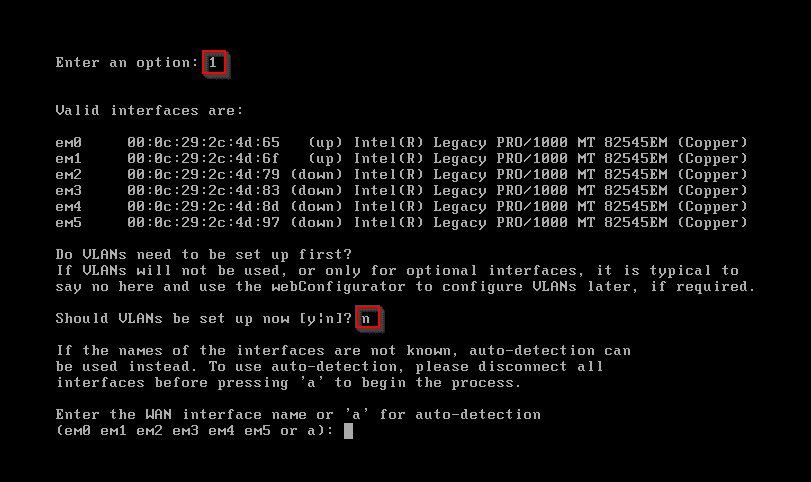
Enter em0, em1, em2, em3, em4, em5 respectively to assign each network. Click y when finished.
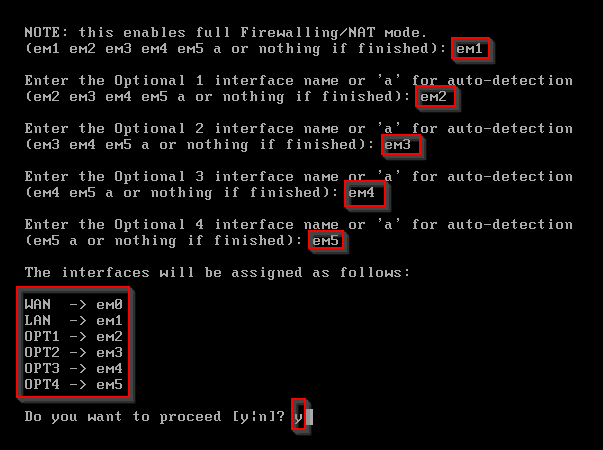
Access Web Interface: Once installed, access the pfSense web interface via the IP address assigned to the LAN interface.
Enter 2 to assign IP addresses. Enter 2 to configure the LAN interface. Enter n for DHCP.
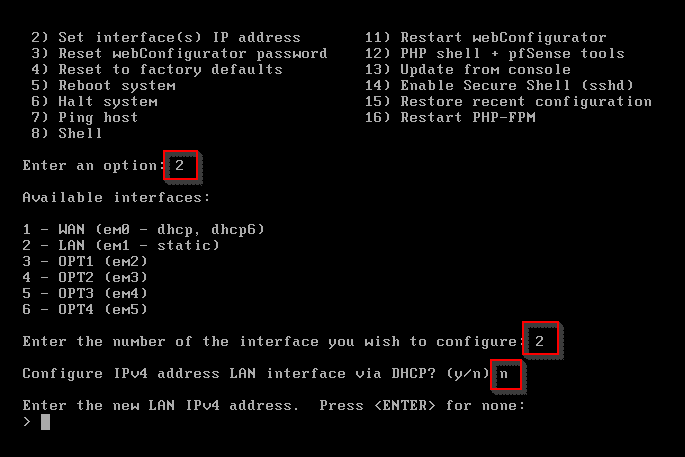
Enter your LAN IPv4. Then enter 24 for subnet.
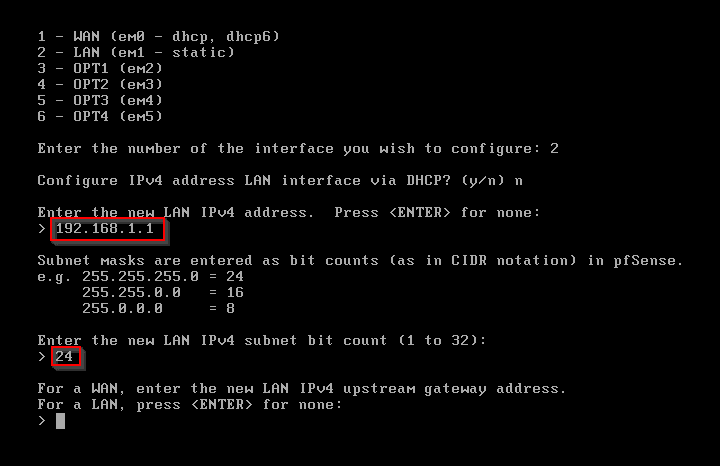
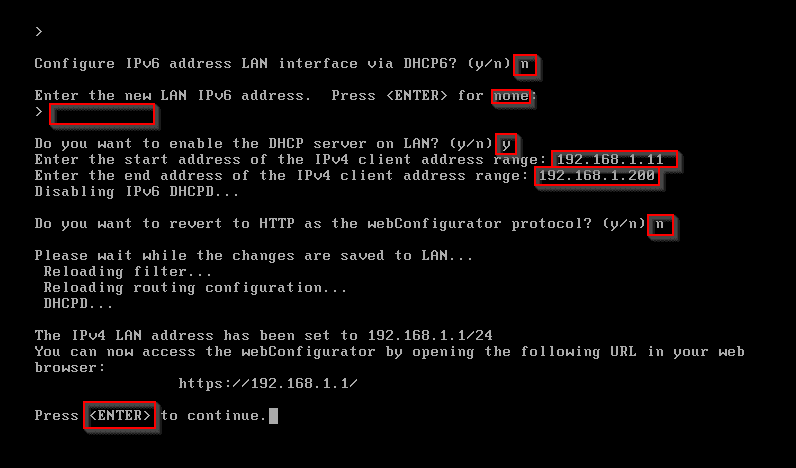
Enter Space Bar for none. Enter n for DHCP6. Enter Space Bar for none. Enter y for DHCP server on LAN. Enter 192.168.1.11 for the IPV4 start address range. Enter 192.168.1.200 for the IPV4 end address range. Enter n for HTTP configuration. Press Enter to continue.
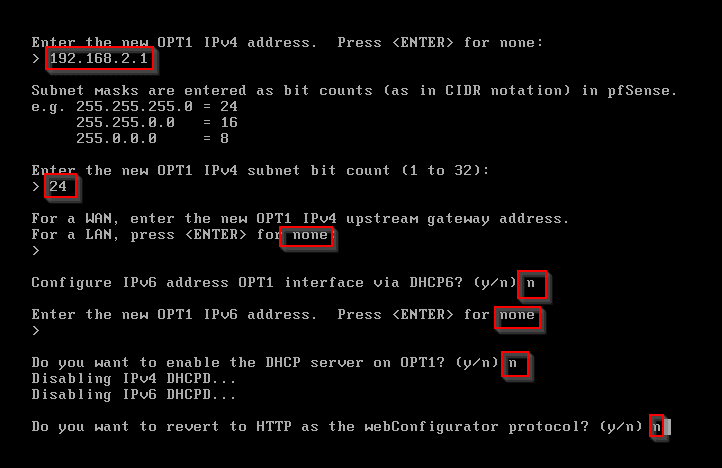
Enter 2 to assign option 1 interface. Enter 3 for OPT1 interface. Enter n for DHCP. Enter 192.168.2.1 for OPT1 IPv4 address. Enter 24 for subnet. Enter none for LAN gateway address. Enter n for DHCP6. Enter none for IPv6 address. Enter n for DHCP server. Enter n for HTTP.
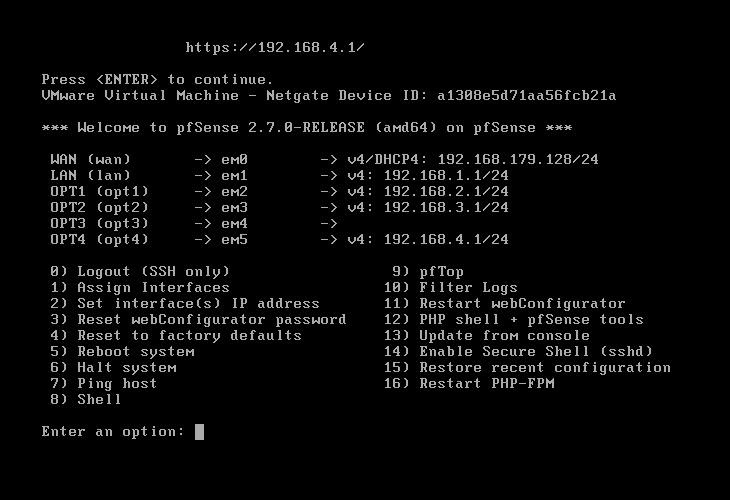
Repeat step 4 for the remainder of OPT2 (192.168.3.1), OPT4 (192.168.4.1). It should look like this:
Setting up Security Onion as a Comprehensive IDS, Security Monitoring, and Log Management Solution
In our cybersecurity homelab, we implement Security Onion, a powerful open-source software designed for network security monitoring, intrusion detection, and log management. An integral component of any robust cybersecurity setup, Security Onion serves as our comprehensive Intrusion Detection System (IDS). This means it constantly monitors our network traffic, raising alerts when it detects potential threats. But it goes beyond simply detecting threats. It provides us with sophisticated tools that enable in-depth investigation into these potential security breaches, offering invaluable insights to mitigate future risks. Additionally, Security Onion assists us in efficiently managing system logs - a critical part of incident response, as these logs record the events happening on our virtual machines. By integrating Security Onion into our lab, we not only enhance our ability to detect and investigate potential threats but also gain a practical understanding of how professional cybersecurity systems function.
Download Security Onion: Visit the Security Onion website and download the latest version.
Create a Virtual Machine: Use your hypervisor (like VMware) to make a new virtual machine. Then, install Security Onion on it.
Launch VMware.
Create a New Virtual Machine and find the path to your Security Onion ISO image file.
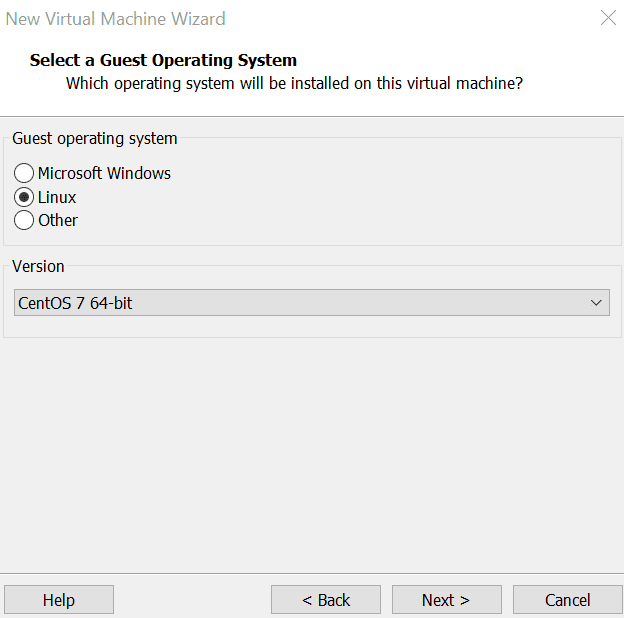
Select Linux and CentOS 7 64-bit. Click Next.
Choose a name for your Virtual Machine. We will use SecurityOnion. Click Next.
Set Maximum Disk Size to 400GB and Store virtual disk in a single file. Click Next.
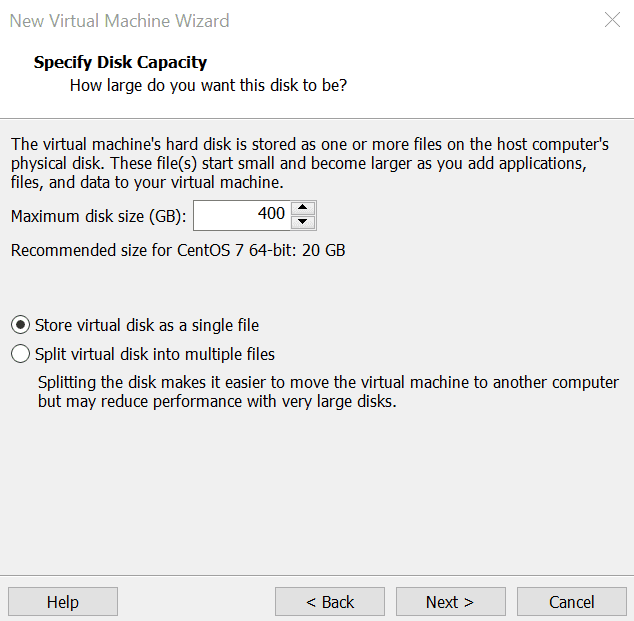
Click Customize Hardware.
Set memory to 16GB of RAM.
Set number of processor cores to 4.
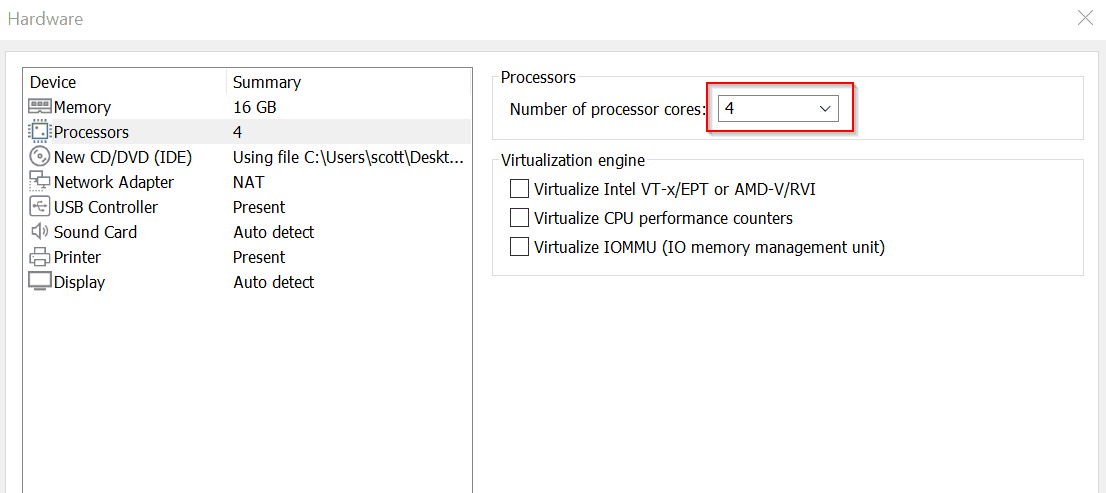
Click Add to add two network adapters and set Network Adapter 2 to VMnet4 and Network Adapter 3 to VMnet5. Click Close.

Click Finish.
Launch SecurityOnion Virtual machine.
Run Setup: Open Security Onion and follow the setup wizard. You'll set your network settings and choose which services you want to run.
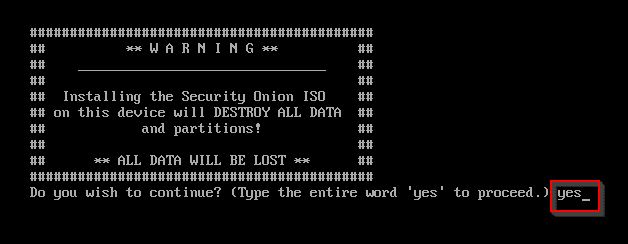
Type yes and hit Enter.
Create a username and password. Hit Enter.
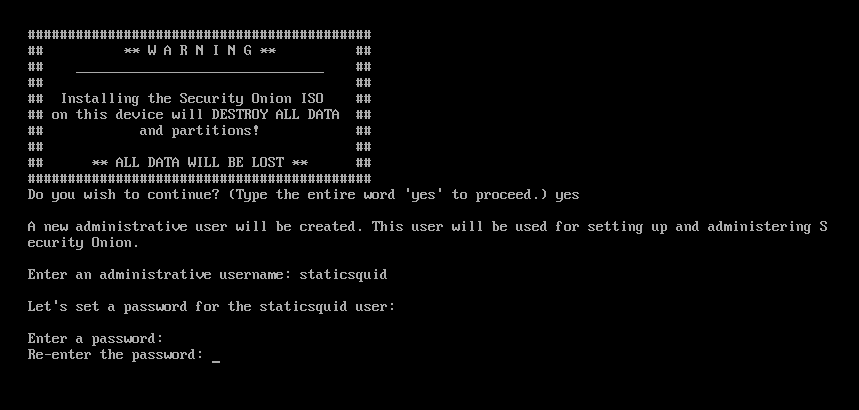
Once it's finished, hit Enter to reboot.
Login with credentials. Hit Enter.

Hit Enter to select yes to continue installation.
Hit Enter to run the standard installation.
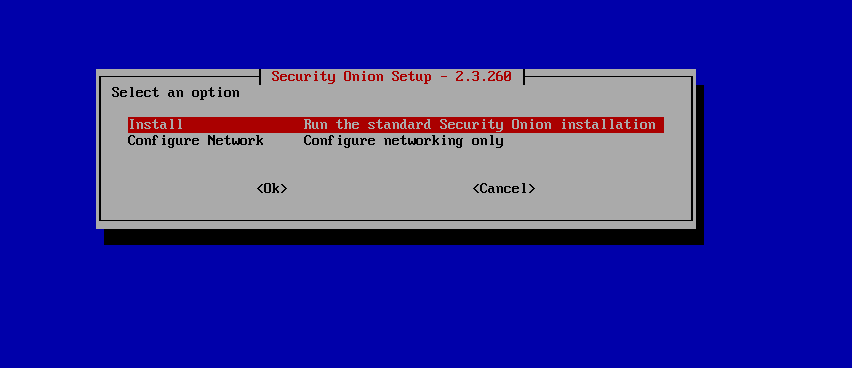
Hit Enter for evaluation.
Type AGREE. Hit Enter.
Hit Enter for hostname.
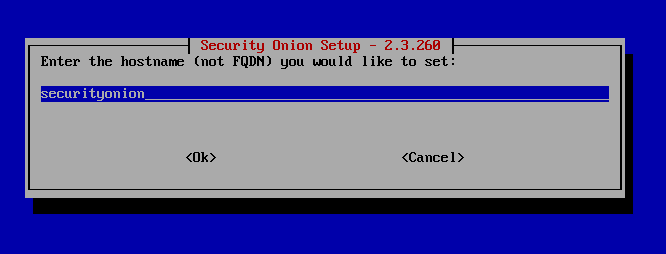
Select Use Anyway.
Press Space Bar to select the first interface.
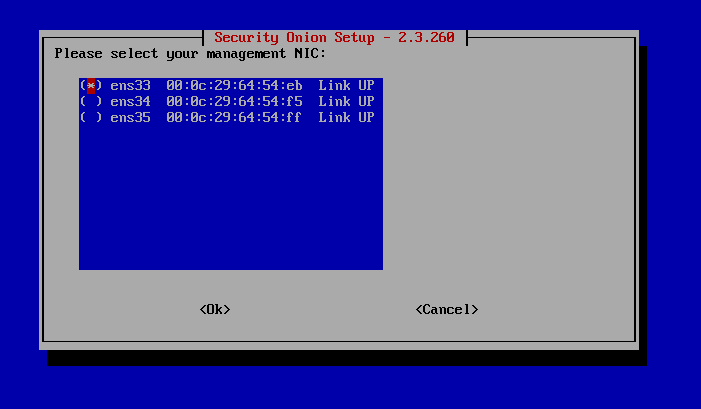
Scroll down and select DHCP and press Space Bar. Hit Enter.
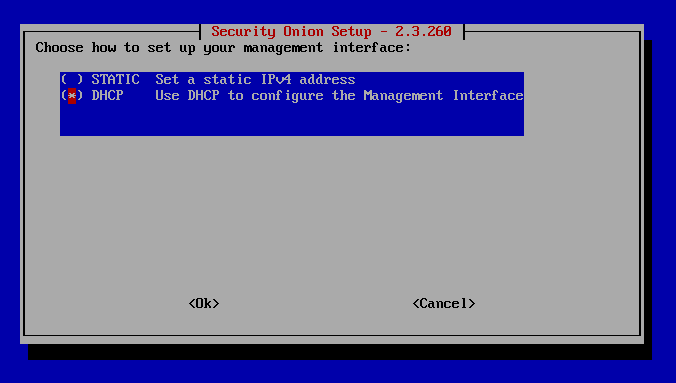
Hit Enter to confirm.
Hit Enter to select ok.
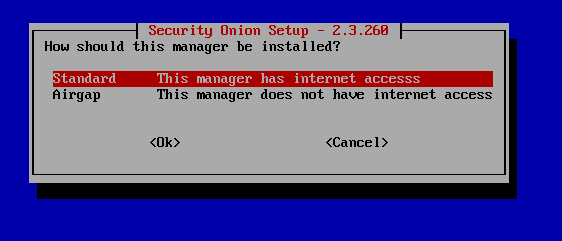
Hit Enter for standard internet access.
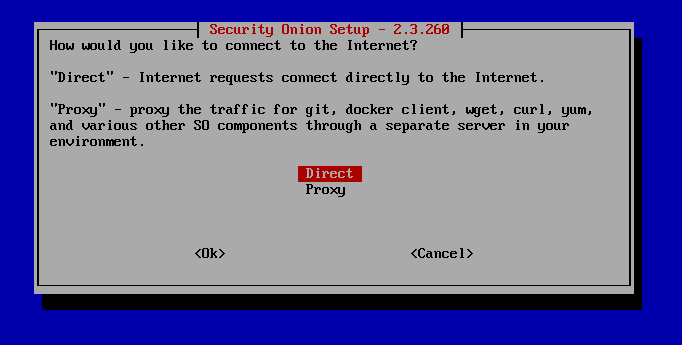
Hit Enter for Direct.
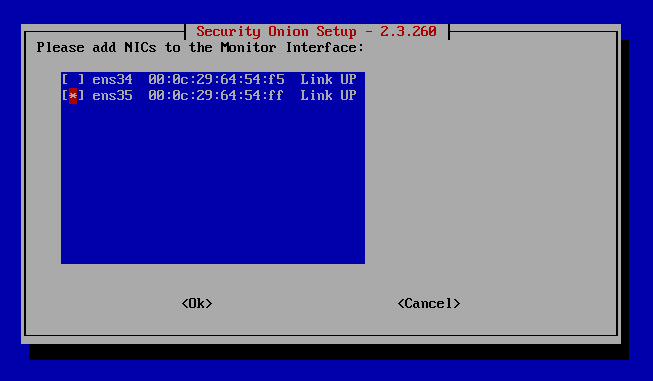
Select ens35 and press Space Bar for monitor interface. Hit Enter.
Hit Enter for Automatic updates.
Hit Enter for default home network.
Choose your optional services and hit Enter.
Hit Enter to select default docker IP range.
Enter an Email Address and Password.
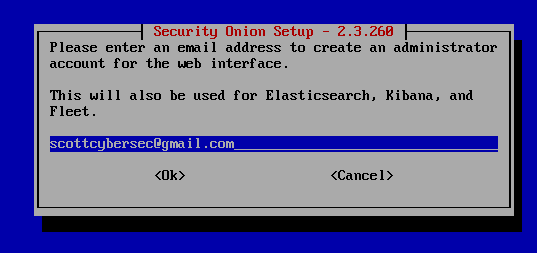
Use IP address. Hit Enter.
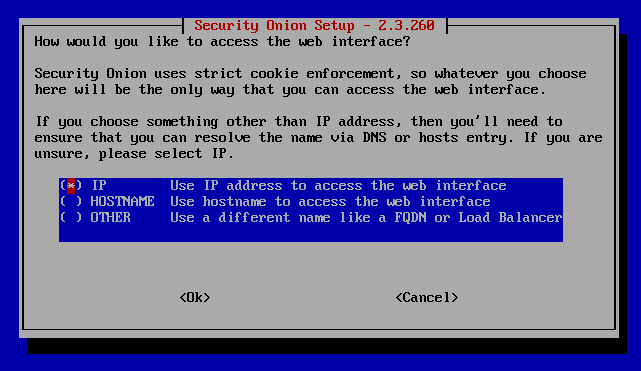
Hit Enter to configure ntp servers.
Hit Enter for default ntp servers.
Select No. We will configure later.

Hit Tab to select yes and Enter for yes. (Take note of Access URL for later. Yours will be different).
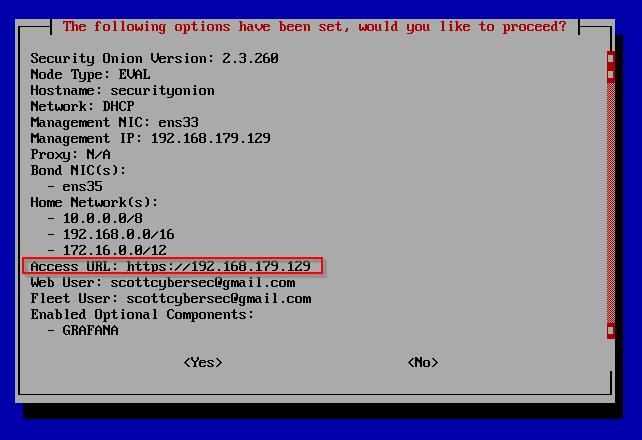
Once finished, hit Enter to reboot.
Configure so-allow: We will first install Ubuntu on VMware. Once installed continue with this section. We will be in Ubuntu then back to Security Onion.
Installing Ubuntu on VMware:
Launch VMware.
Create a New Virtual Machine
Select the path for your Ubuntu ISO image.
Assign a name to your virtual machine and a username and password.
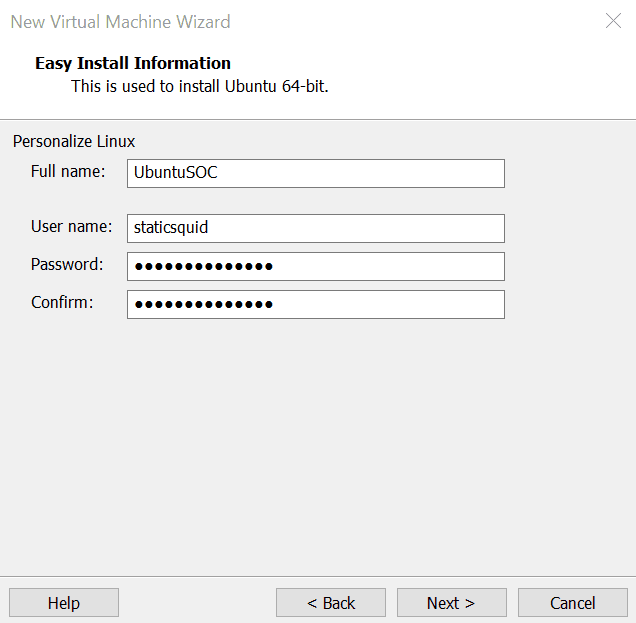
Click next on all the default settings and click finish.
Launch Ubuntu and choose your settings for installation.
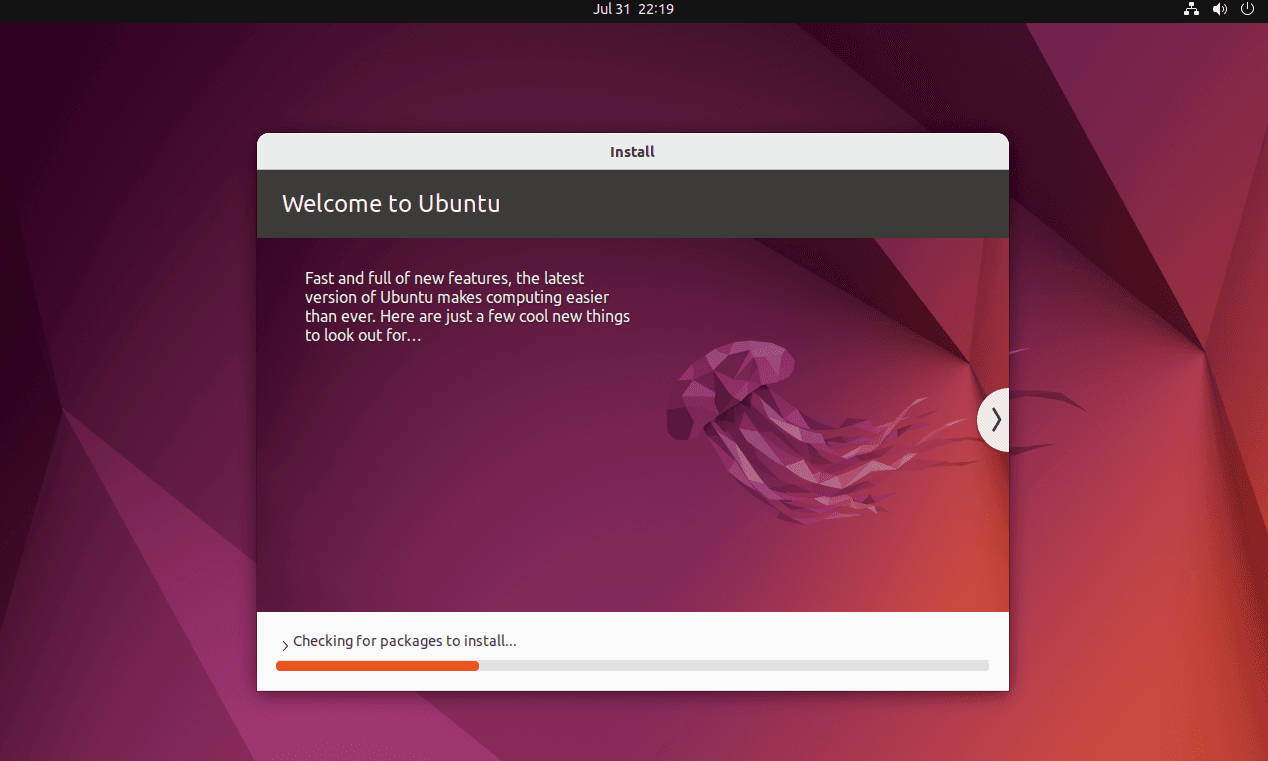
Once finished, select restart.
Login with your credentials.
Open terminal in Ubuntu.
Type ipconfig
Type sudo apt install net tools
Type your password for sudo
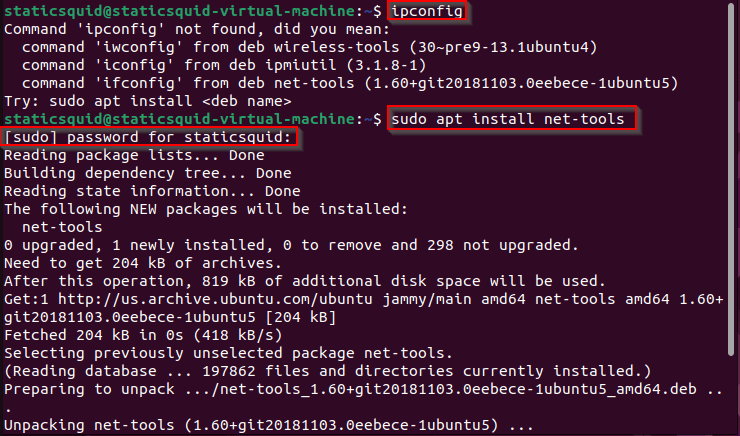
Type ifconfig. Note down the IP address in the image.
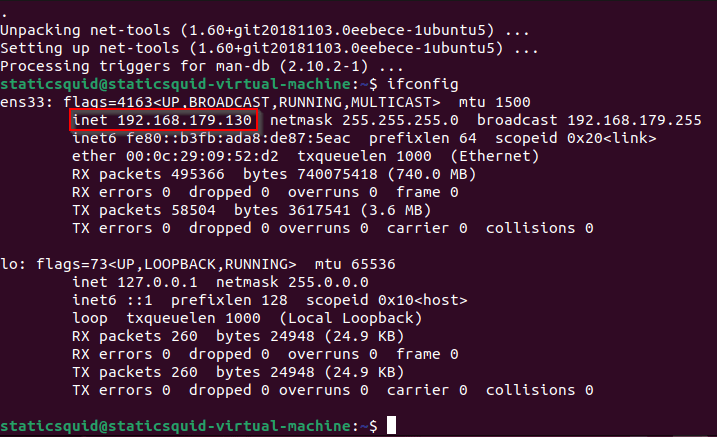
Launch Security Onion
Login with your credentials.
Type in sudo so-allow. Type in your sudo password.
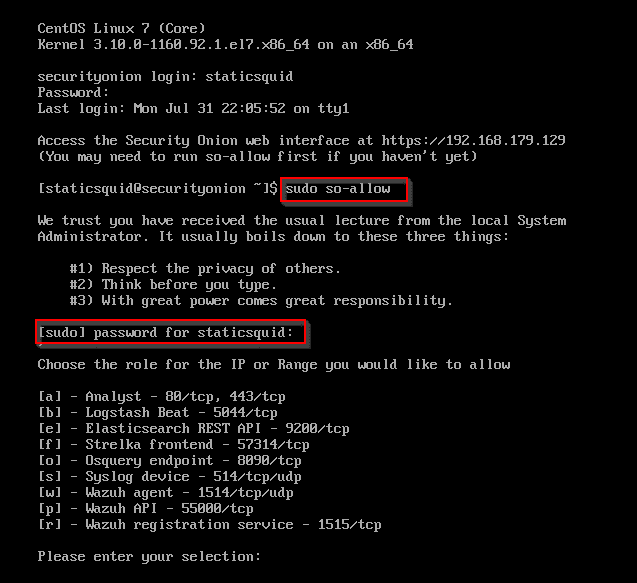
Type a to select Analyst.
Type in the IP address you noted down from ifconfig in Ubuntu. Hit Enter.

Go back to Ubuntu.
Launch Firefox.
Type in the security onion web interface from the image above. 192.168.179.129.
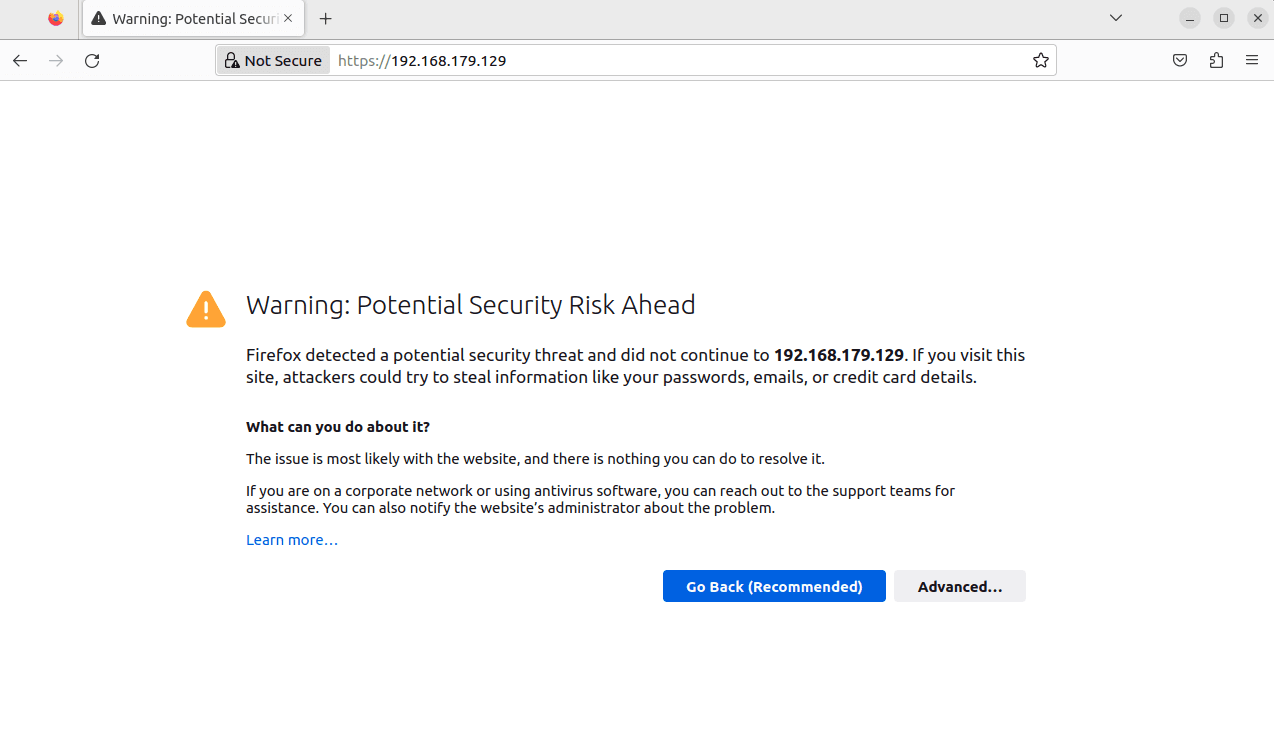
Click Advanced.
Click Accept the Risks and Continue.
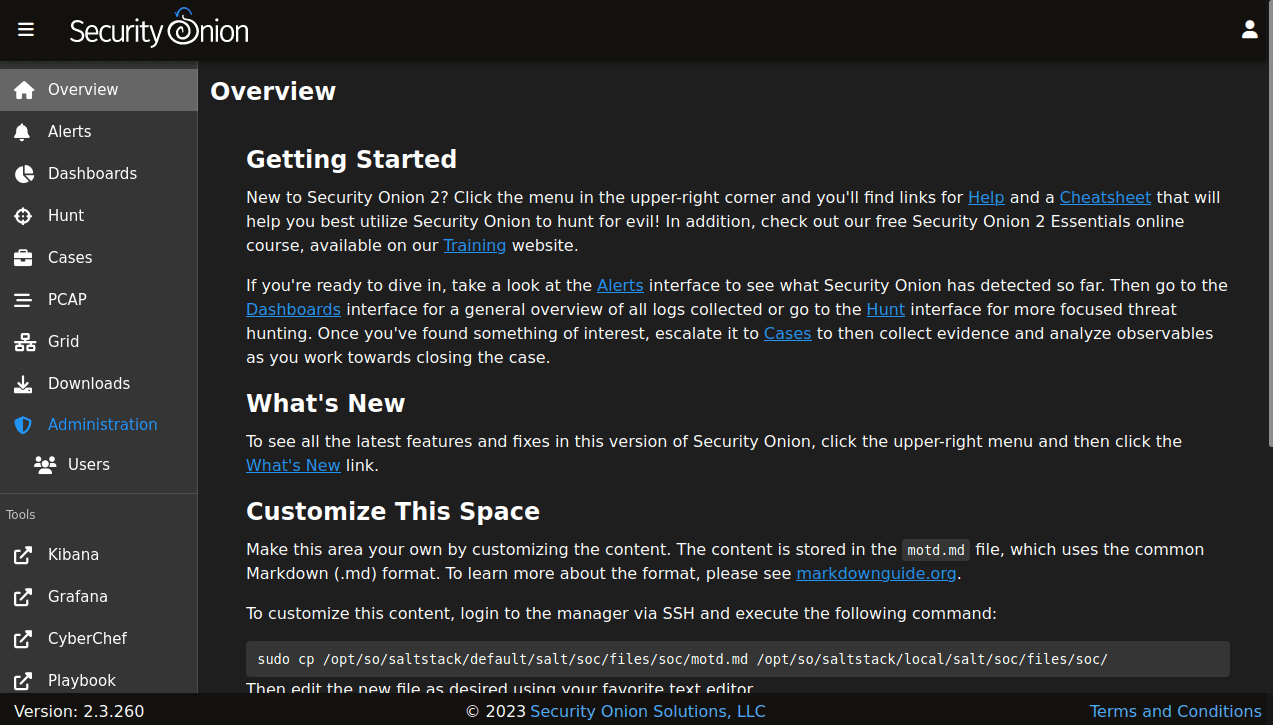
Log in to Security Onion.
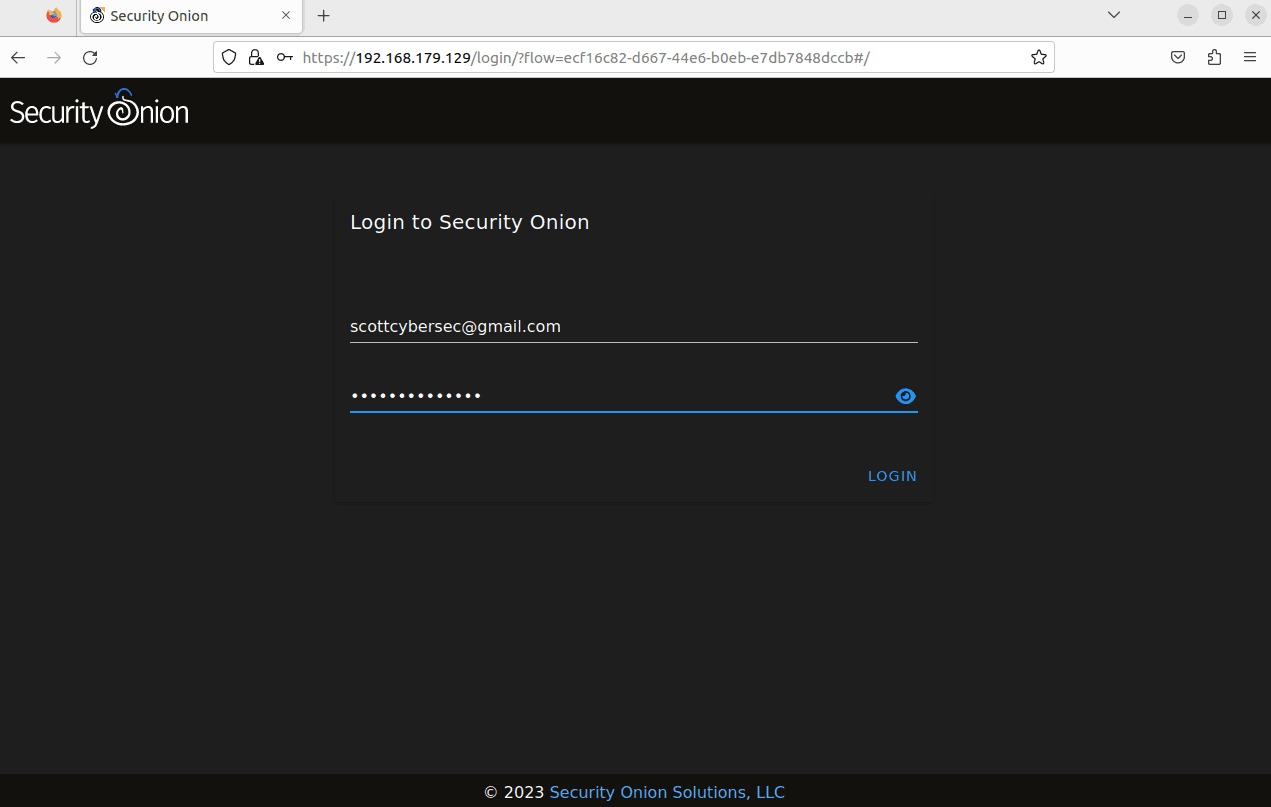
Test Setup: Finally, make sure everything works
Preparing Kali Linux for Attack Simulations
Kali Linux is a specialized Linux distribution, specifically tailored for digital forensics and penetration testing. It's a fundamental tool in our cybersecurity lab due to its capacity for simulating various types of cyber attacks. Loaded with numerous security tools, Kali Linux enables us to emulate real-world attacks on our virtual network. This process is not only eye-opening, revealing how such attacks transpire and how to thwart them, but also equips us with the practical experience of using professional cybersecurity tools. Most importantly, all of this is conducted within the confines of our controlled lab environment, eliminating any risk to actual systems or breaching legal boundaries. In short, by preparing Kali Linux for attack simulations in this lab, we are paving a crucial path for hands-on learning in cybersecurity.
Download Kali Linux: Visit the Kali Linux website and download the latest version.
Download Kali Linux here. (We can download the Pre-built Virtual Machine)
Create a Virtual Machine: In your hypervisor (like VMware), Open a new virtual machine. Install Kali Linux on this virtual machine.
Launch VMware.
Open a New Virtual Machine.
Select the path to Kali Linux VM image.
Select Edit virtual machine settings.
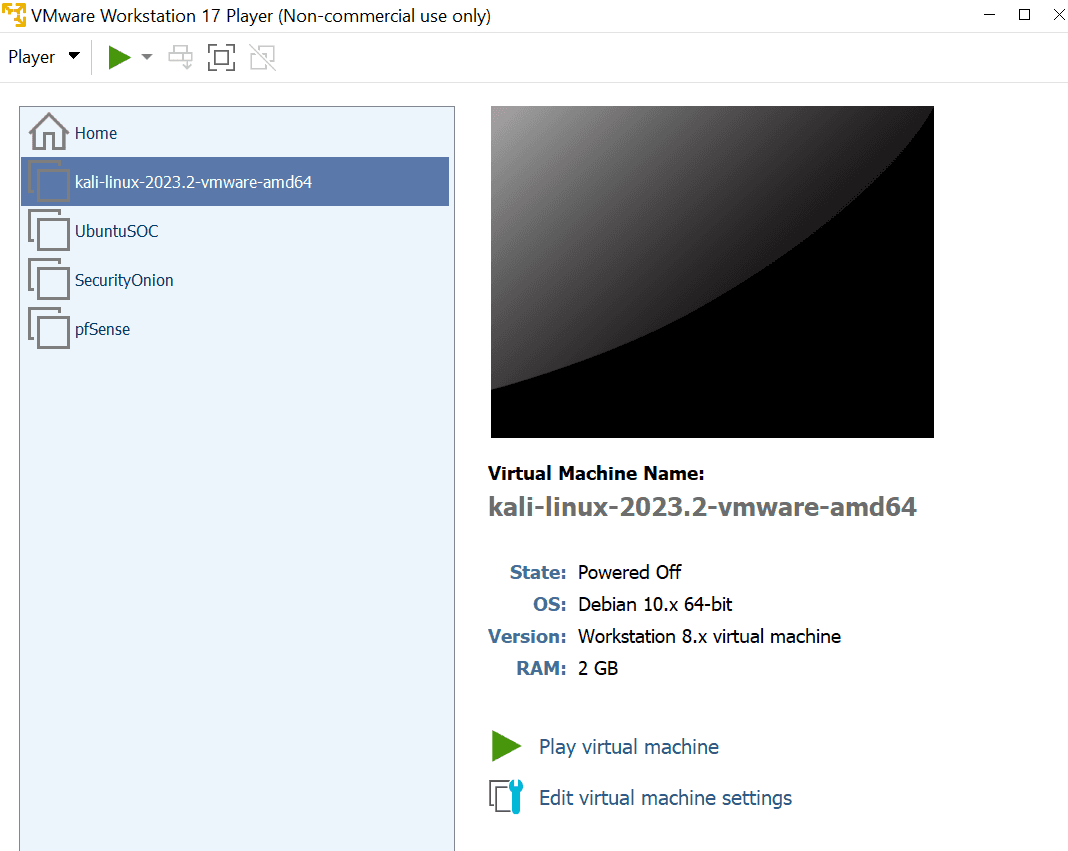
Set your Maximum disk size. We will choose 4GB.
Click Add to add a network adapter. Map it to VMNnet2. Click OK.
Click Finish.
Launch Kali Linux.
Login credentials are:
Username: kaliPassword: kali
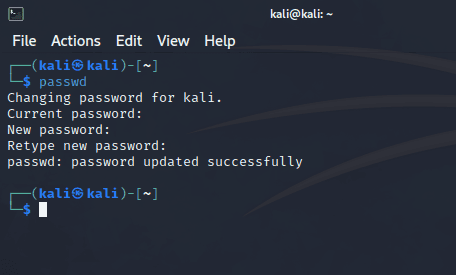
Open Terminal type in passwd and change the default password to a more secure one of your choice.
Access pfSense WebConfigurator to make changes to the firewall rules:
Open Firefox (or another web browser) and enter IP address https://192.168.1.1 in the URL. Go to Advanced and select Accept the Risk and Continue.
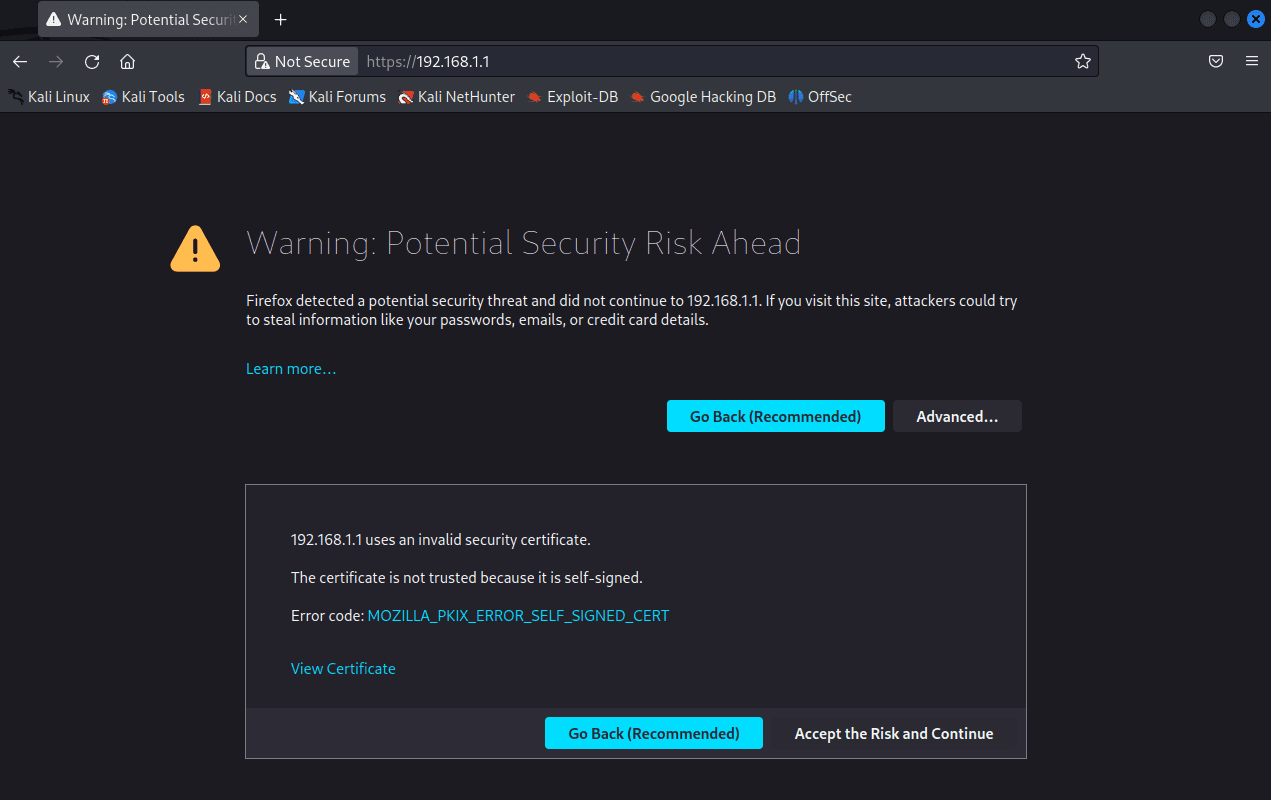
Login with
Username: admin
Password: pfsense
Click Next until you reach General Information.
Primary DNS Server is: 8.8.8.8
Secondary DNS Server is: 4.4.4.4
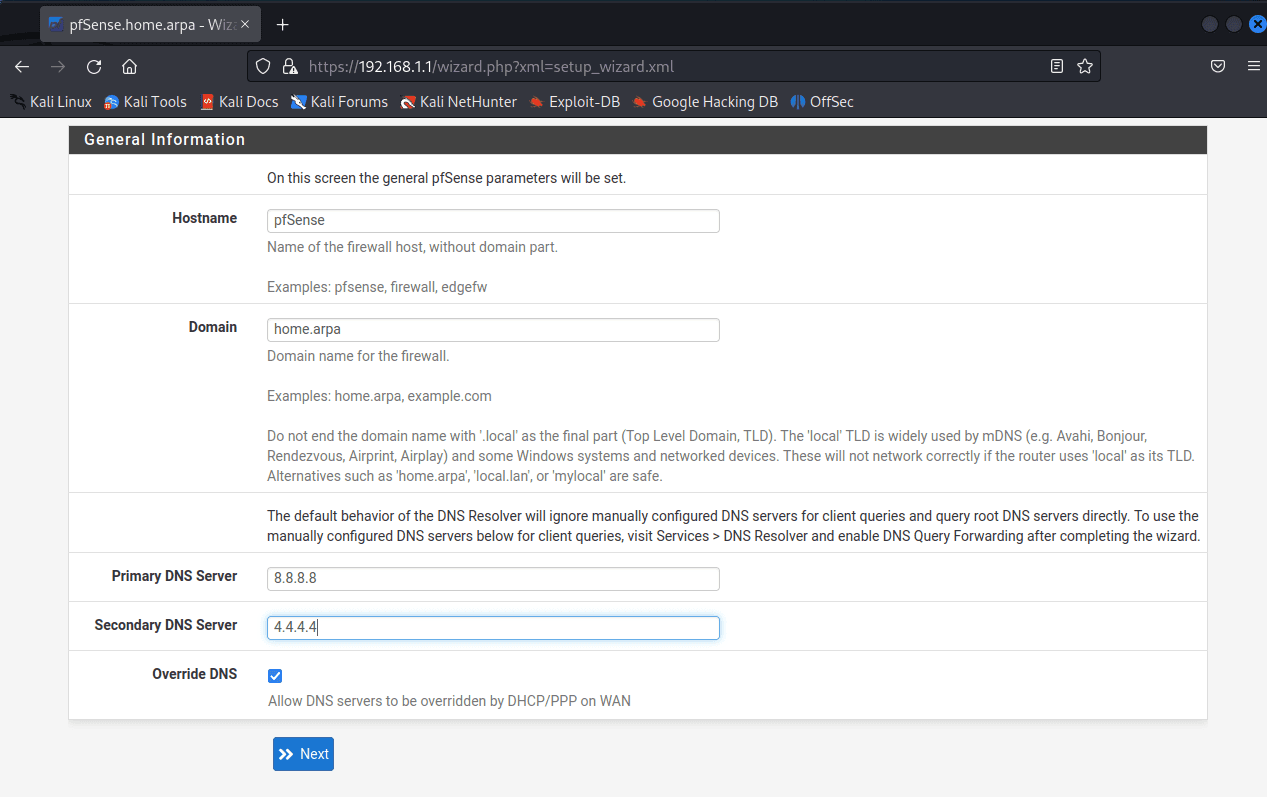
Select your Timezone.
Click Next.
Click Next for LAN interface.
Create a new password.
Select Reload.
Click Finish.

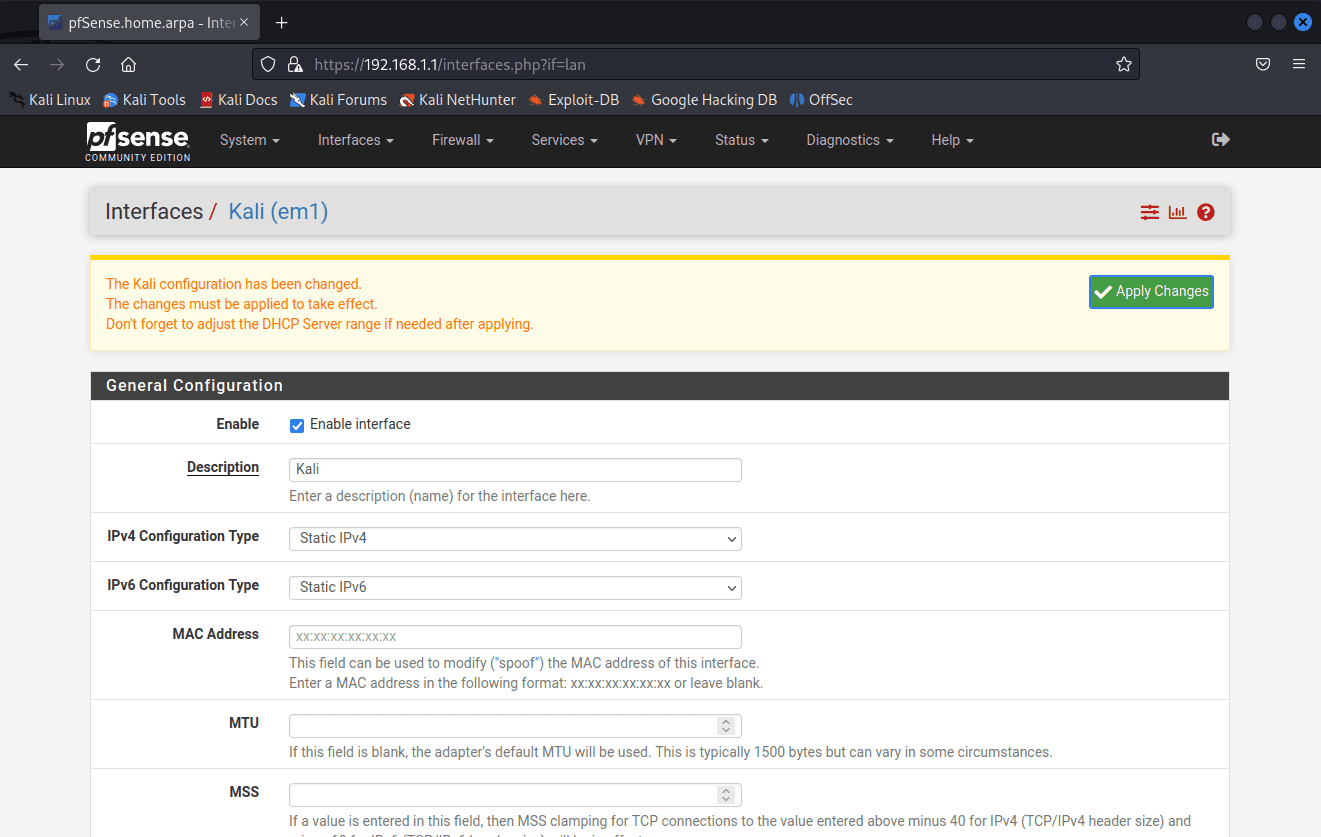
Navigate to interface > LAN.
Type Kali in Description
Select IPv6 Configuration Type to Static IPv6.
Scroll down to Static IPv6 Configuration and type in ::1 into IPv6 Address.
Click Save and Apply Changes.
Navigate to Services > DHCPv6 Server & RA.
Navigate to Router advertisements.
Disable Router mode and click save.

Navigate to Interface > Kali.
Select None for IPv6 Configuration Type.
Click Save and Apply Changes.
Navigate to Interface > OPT1.
Rename it to VictimNetwork.
Click Save and Apply Changes.
Navigate to Interface > OPT2.
Rename it to SecurityOnion.
Click Save and Apply Changes.
Navigate to Interface > OPT3.
Rename it to SpanPort.
Check the box for Enable to enable interface.
Click Save and Apply Changes.
Navigate to Interface > OPT4.
Rename it to Splunk.
Click Save and Apply Changes.
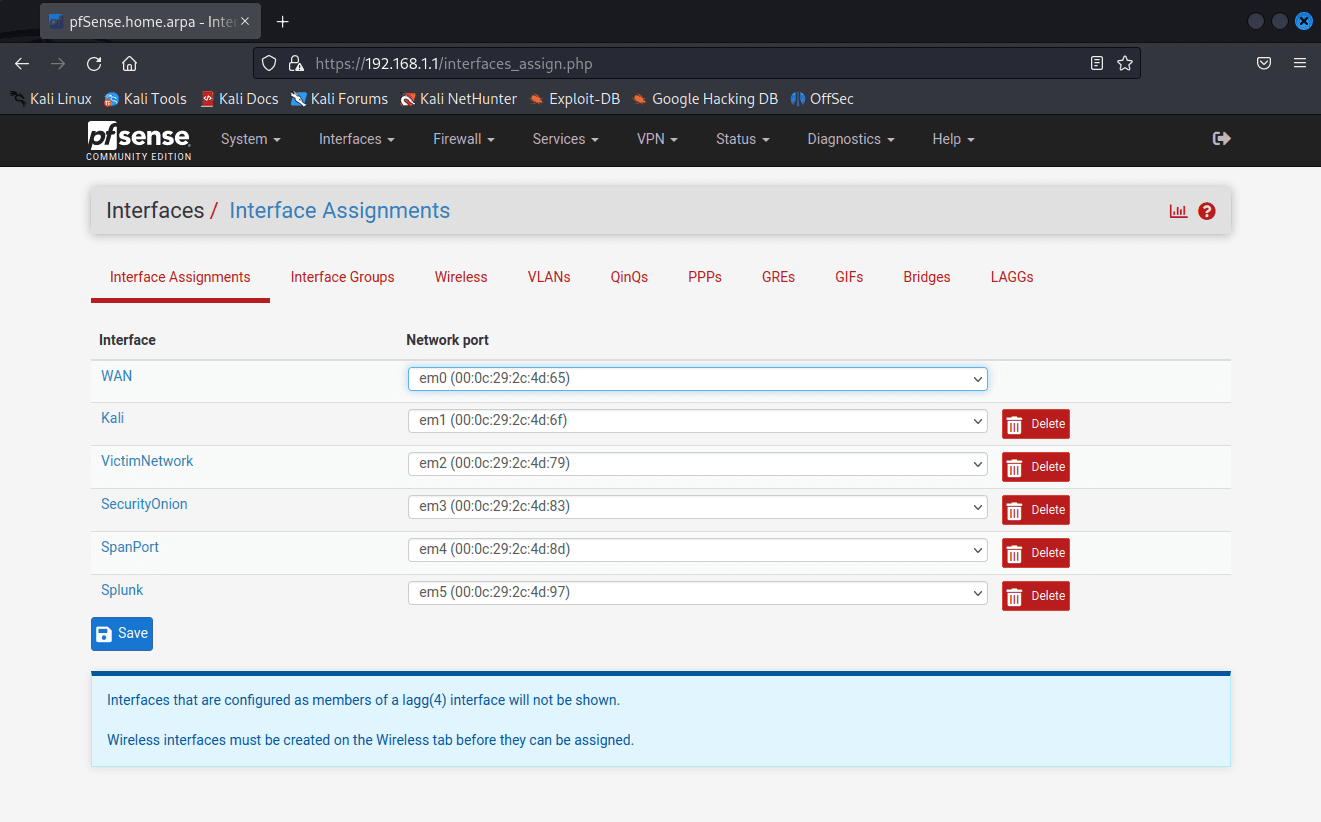
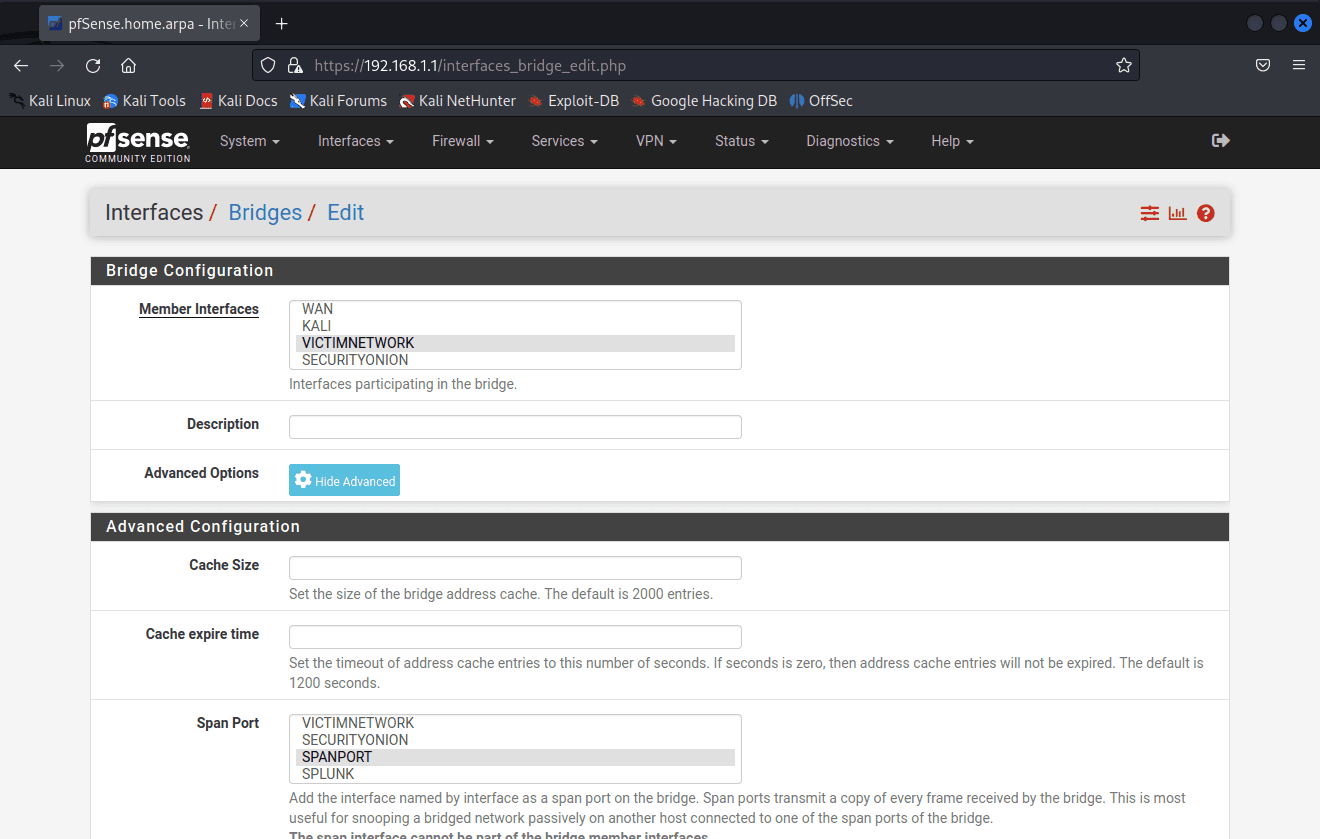
Navigate to Bridges.
Click Add.
Choose VictimNetwork for Member interfaces.
Click Display Advanced.
Choose SpanPort for Span Port.
Click Save.
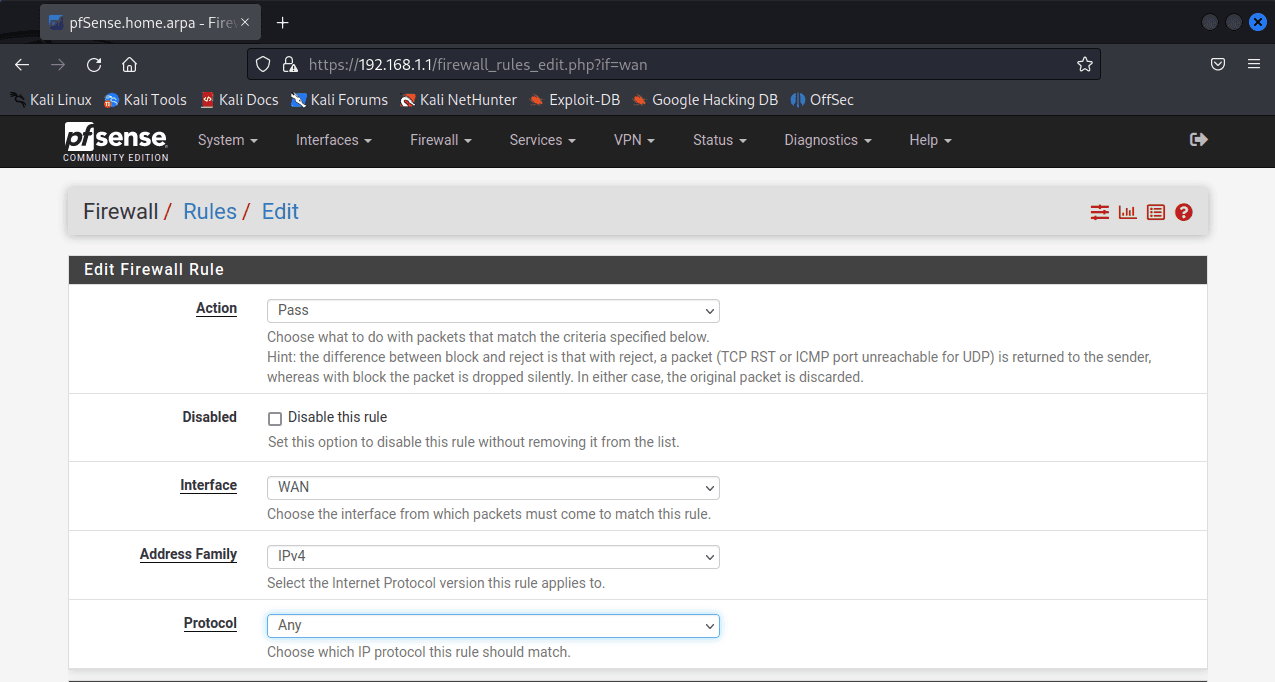
Navigate to Firewall > Rules.
Click Add.
Change Protocol to Any. Click Save.
Setting up a Windows Server to Function as a Domain Controller
A Domain Controller, think of it as the boss of a Windows network, is in charge of all the important stuff like user logins, deciding who gets to access what, and making sure resources are shared correctly. It uses a nifty tool known as Active Directory, which is like the 'phonebook' of the network, keeping a record of all users and computers.
Having a Windows Server as a Domain Controller in our cybersecurity homelab is super valuable. It mirrors what we'd see in a real business setting, letting us learn about managing a network. What's even better is that our lab is a secure environment, so we can experiment and play around with different settings, exploring the ins and outs of cybersecurity without worrying about messing up a real network.
Download Windows Server 2019 and Windows 10:
Create a Virtual Machine: First, use your hypervisor (like VMware) to create a new virtual machine. Install Windows Server on this machine.
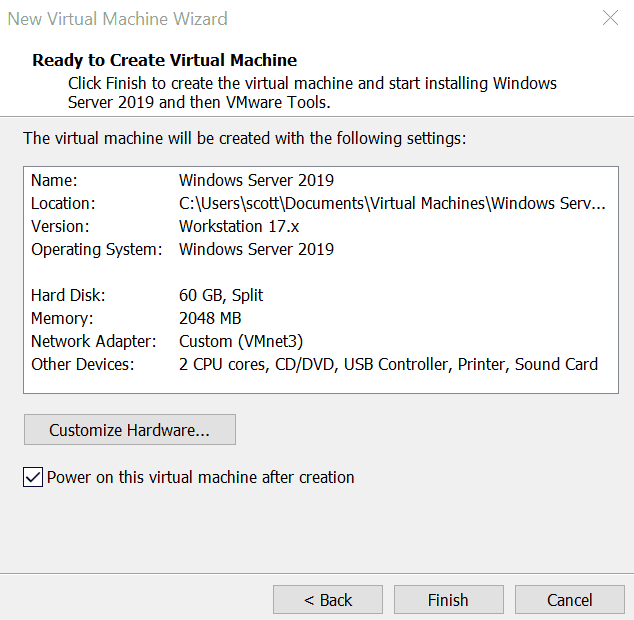
Creates a New Virtual Machine.
Select the Path to your Windows Server 2019 ISO.
Proceed without Product Key.
Name your Virtual Machine.
Select your storage. We will use 60GB.
Select Customize Hardware.
Set default Network Adapter to custom: VMnet3.
Remove Floppy Drive.
Click Finish.
Launch Windows Server 2019.
Make sure to press any button to continue.
Windows Setup:
Click Next, then Install Now.
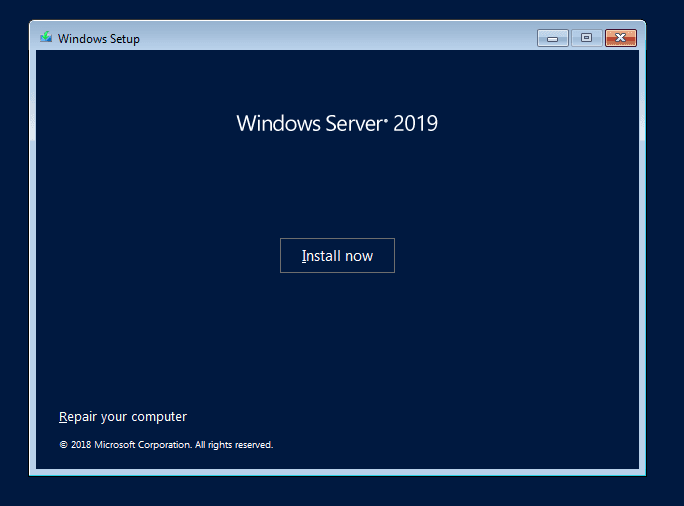
Select the second option for Desktop Experience.
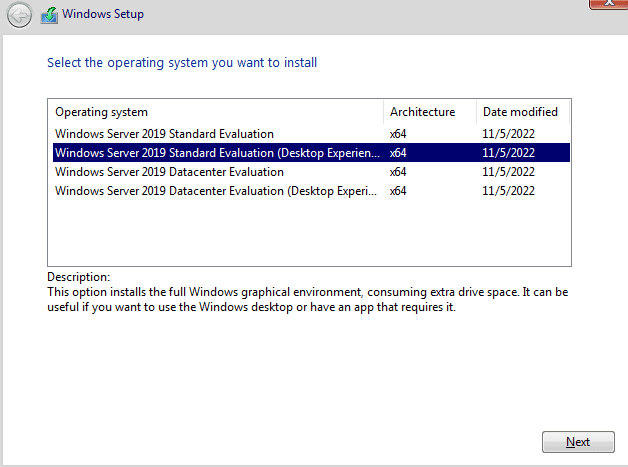
Accept the license and terms.
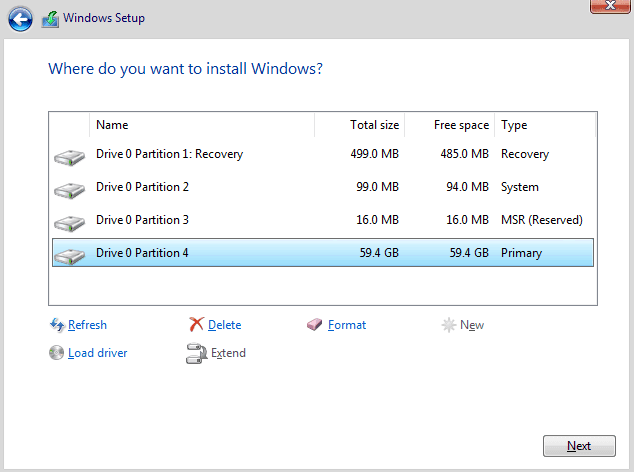
Choose Custom Install.
Select New, Apply, Then OK.
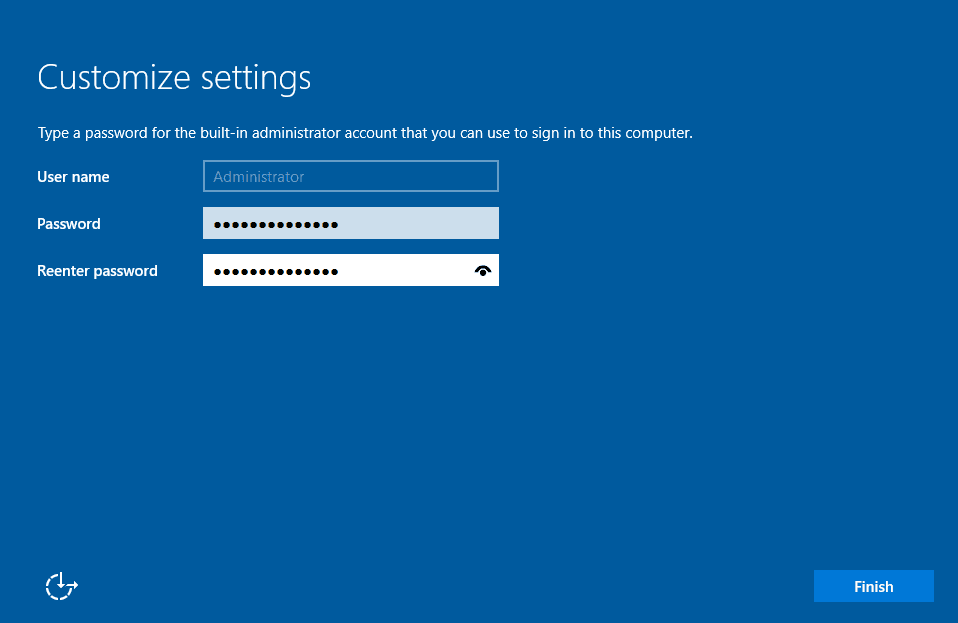
Create a new password.
Login with your credentials and launch Server Manager Dashboard.
Configure Server: Start the Server Manager Dashboard, select "Add roles and features," and then click "Next" until you get to "Server Roles."
First, lets rename your pc by navigating to settings > Search for "About this PC" > Rename this PC.
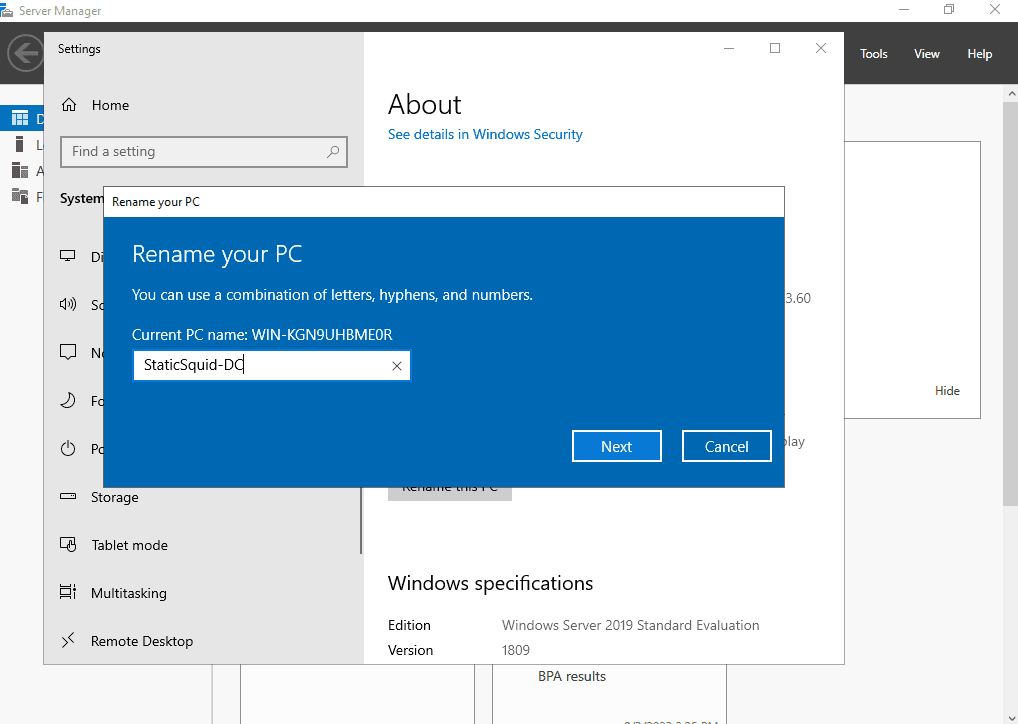
Restart your Virtual Machine.
Go to Server Manager Dashboard.
Navigate to Manage > Add Roles and Features.
Click Next.
Click Next for Role-based or Feature-based installation.
Click Next on Server Selection.
Select Active Directory Domain Services and click Add Features. Click Next.
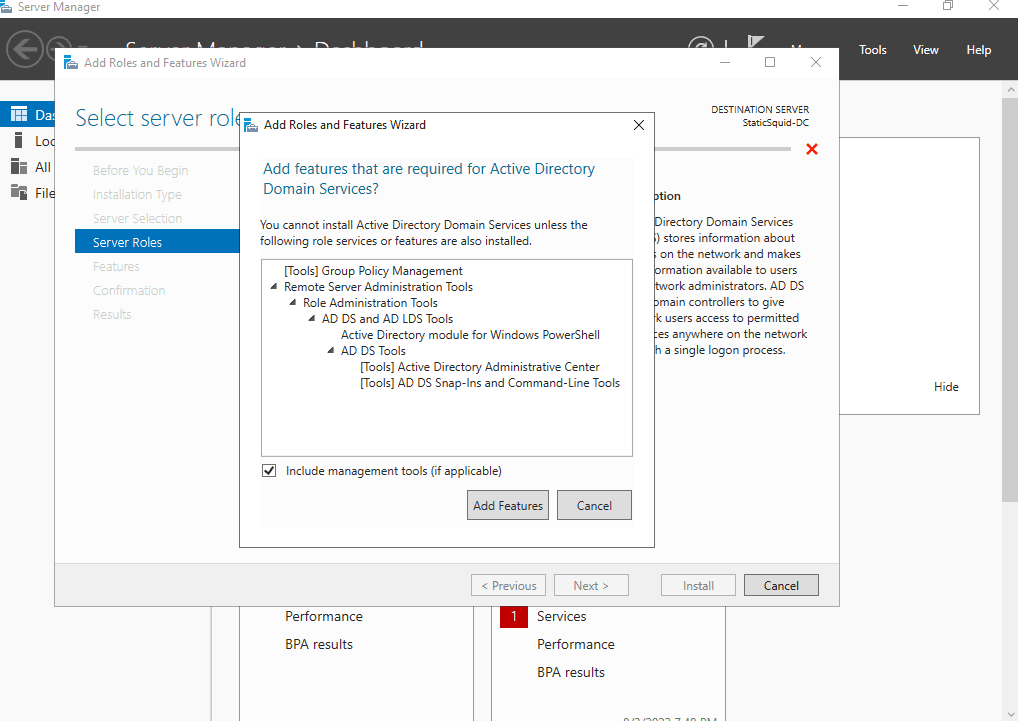
Click Next for Features.
Click Next for AD DS.
Click Install for confirmation.
After installation is finished, navigate to notifications > promote this server to a domain controller.
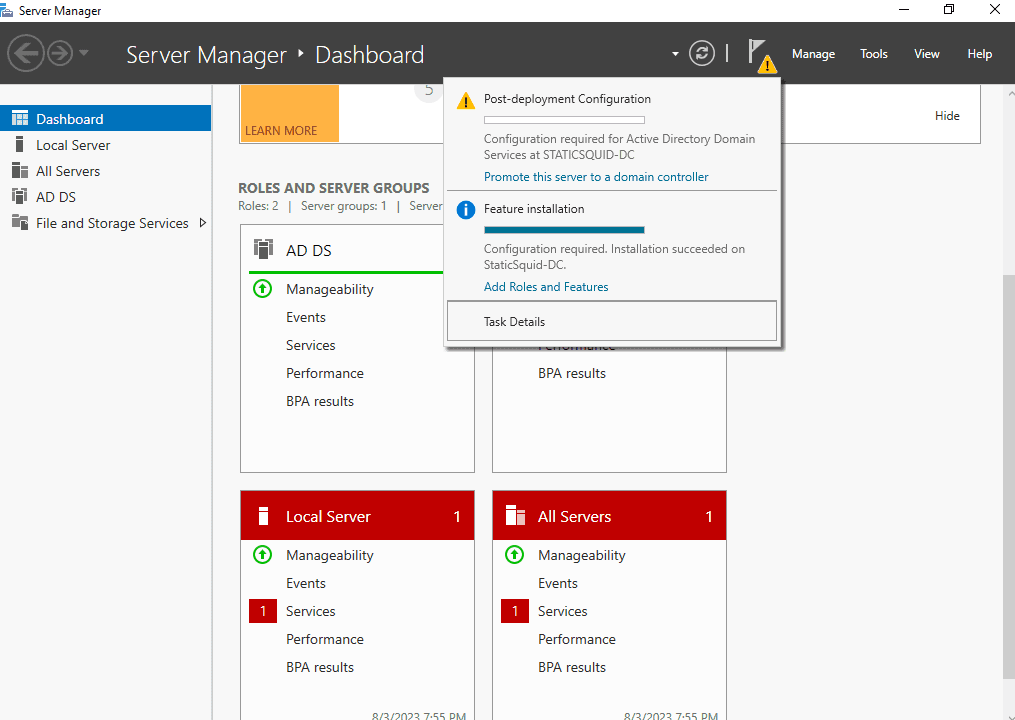
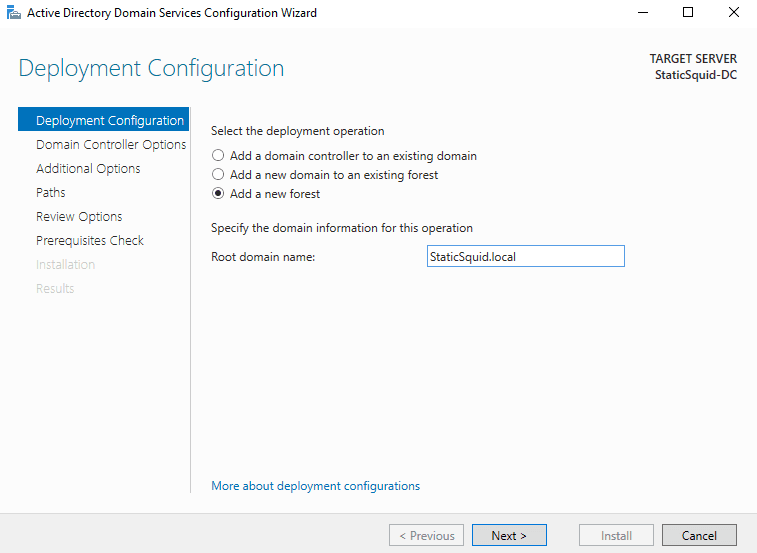
Select Add a new forest. Enter a Root domain name ending in .local. Click Next.
Setup your password. Click Next.
Click Next for DNS options.
Click Next once verified.
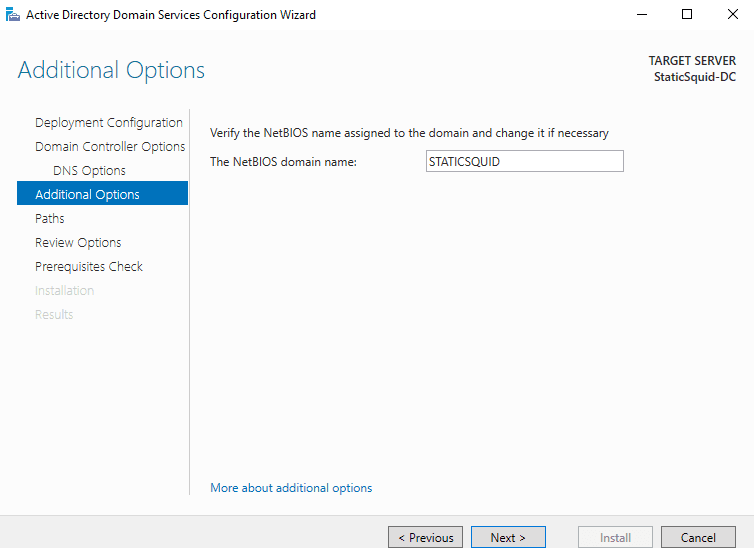
Click Next for Paths.
Click Next for Review Options.
Click Install. The system will be rebooted when finished.
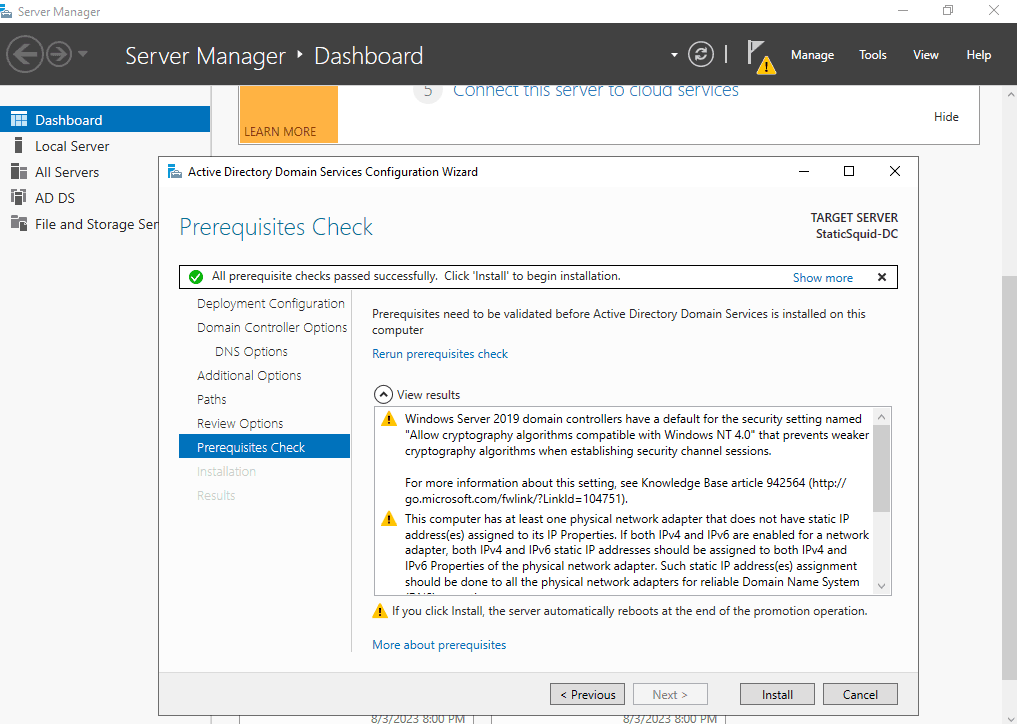
Install AD DS: In "Server Roles," select "Active Directory Domain Services" (AD DS). This will prompt you to add some additional features. Click "Add Features," then "Next," and finally "Install."
Go to Server Manager Dashboard.
Navigate to Manage > Add Roles and Features.
Click Next on before you begin.
Click Next on installation type.
Click Next on Server Selection.
Select Active Directory Certificate Services and Add Features. Click Next.
Click Next on Features.
Click Next on AD CS.
Check Restart the destination server automatically if required. Then click Install.
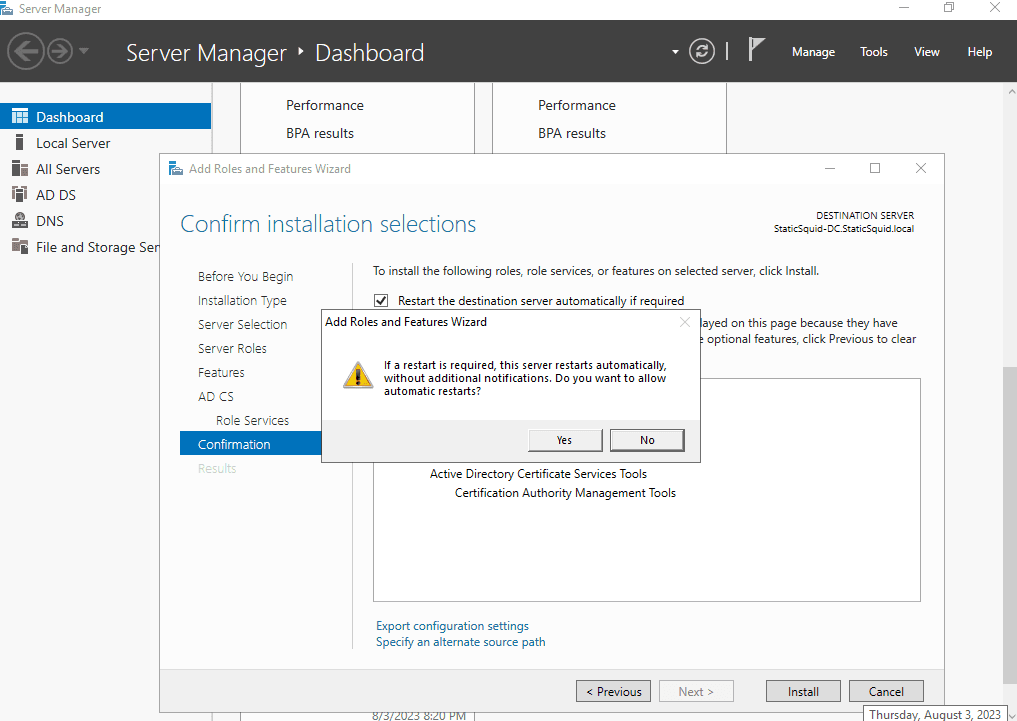
Once finished, Navigate to notifications > Configure active directory certificate services on the destination server.
Click Next on Credentials.
Select Certification Authority. Click Next.
Select Validity Period on the left pane and set to 99 years. Select Next.
Select Next on Certificate Databse.
Select Configure on Confirmation.
Click Close.
Manually reboot.
Add Users:
Navigate to tools > Active Directory Users and Computers.
Select your domain > Users > Rick click > New > User.
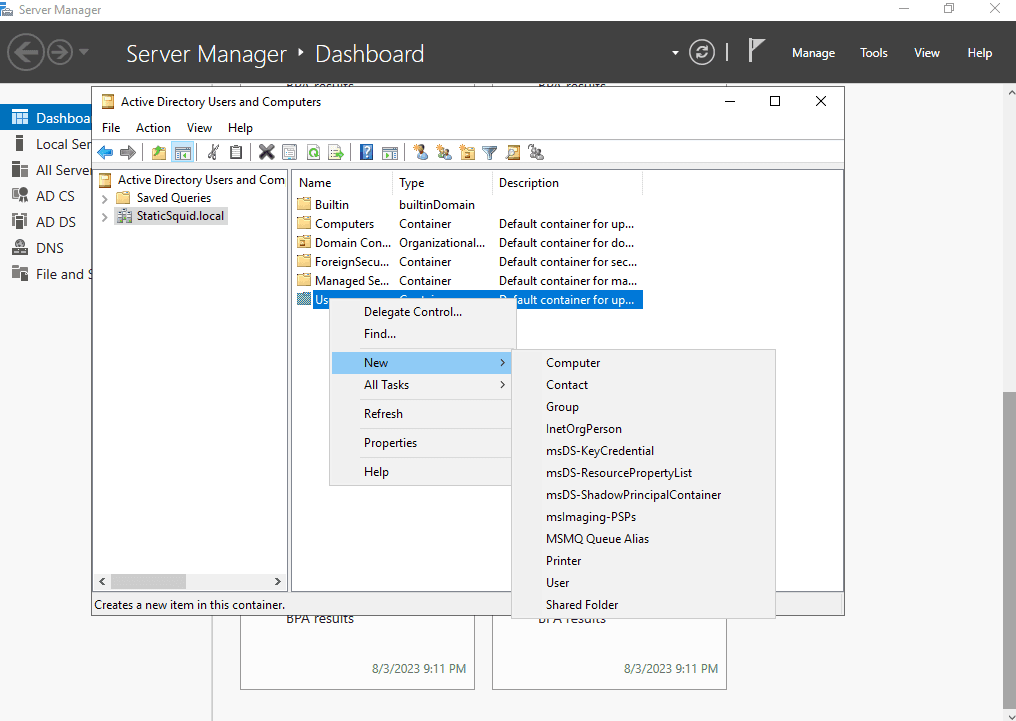
Create your user. Click Next.
Create your password. Finish.
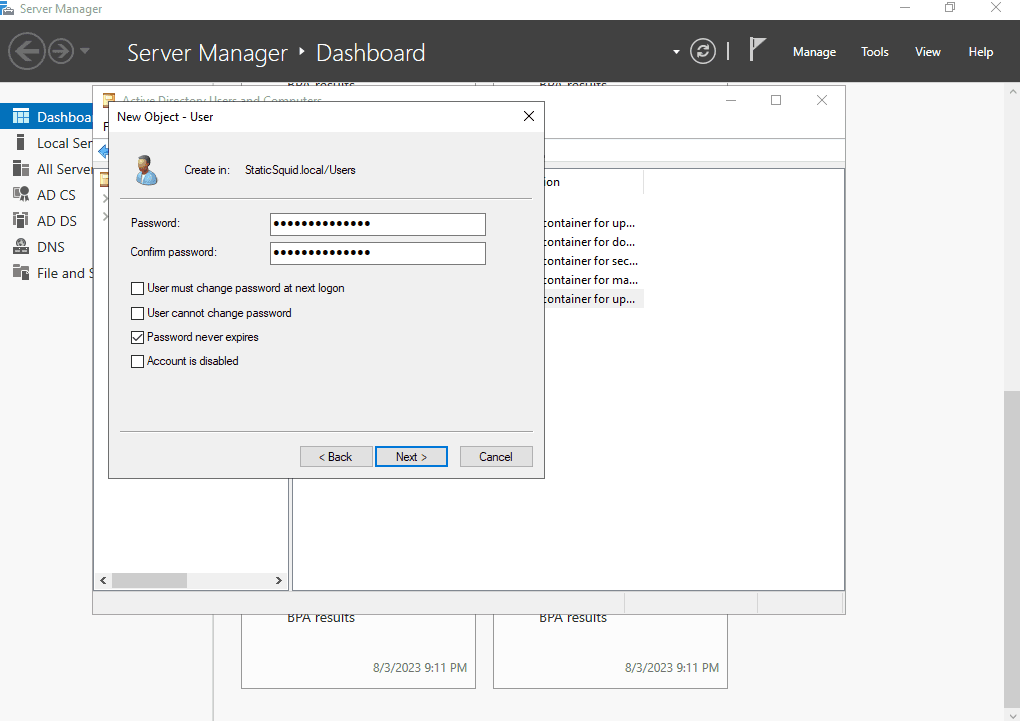
Log In: After the restart, you can log in with your domain administrator credentials.
Test Setup: Open "Active Directory Users and Computers" to see if everything is working correctly.
Optional Disable Firewall: Disable firewall for learning purposes for this lab environment.
Search for windows defender firewall.
Turn off windows defender firewall on the left pane. Turn off all options.
Add pfSense as default gateway:
Navigate to Control Panel
Navigate to Network and Internet > Network Connections > Your network.
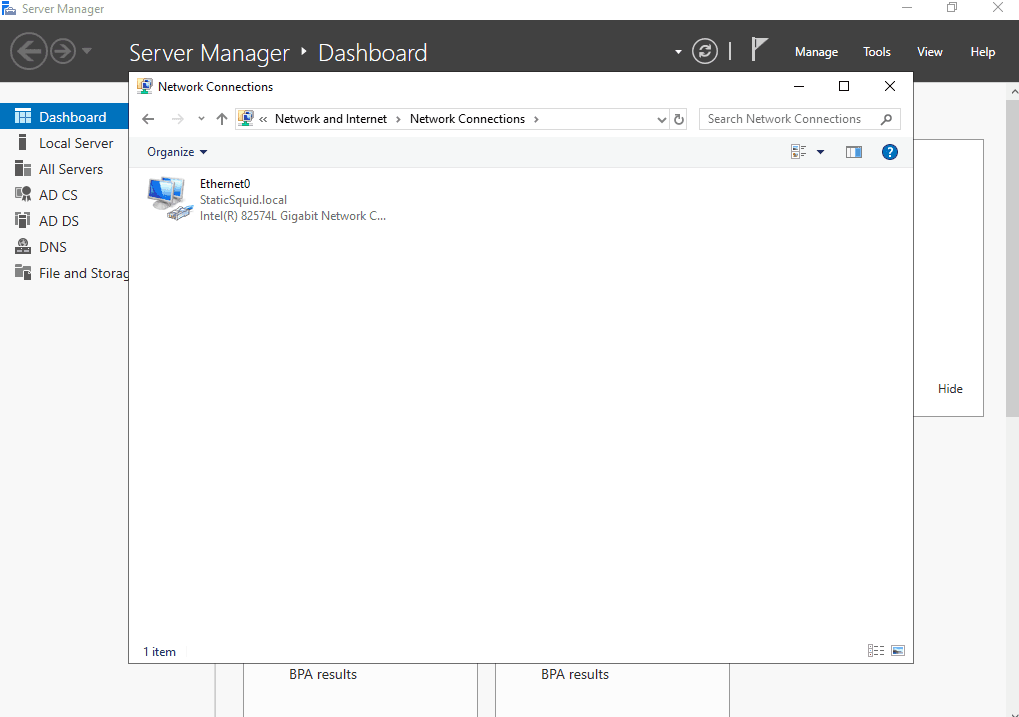
Right click > Properties.
Select Internet Protocol Version 4 (TCP/IPv4)
Select Use the following IP address.
IP address: 192.168.2.10Subnet Mask: 255.255.255.0
Default gateway: 192.168.2.1\Select Use the following DNS server address:
Preferred DNS server: 192.168.2.1Click OK.
Configuring Windows-Based Desktops
Launch VMware.
Create a New Virtual Machine.
Select the path to your Windows 10 ISO.
Skip the product key and click Next.
Name the virtual machine the first user you set in your DC.
Select Next for Disk Space Capacity.
Click Customize Hardware.
Change Network Adapter to VMnet3
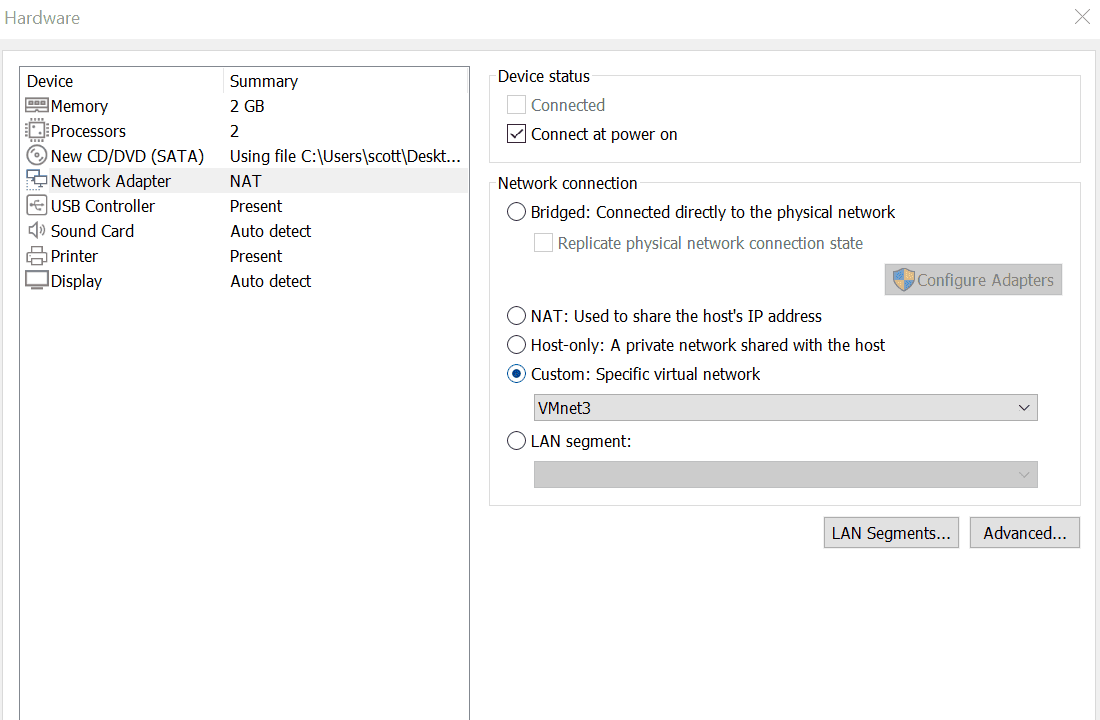
Uncheck "Power on this Virtual Machine after Creation". Click Finish.
Edit Virtual Machine Settings.
Remove the Floppy Drive. Click OK.
Install Windows 10.
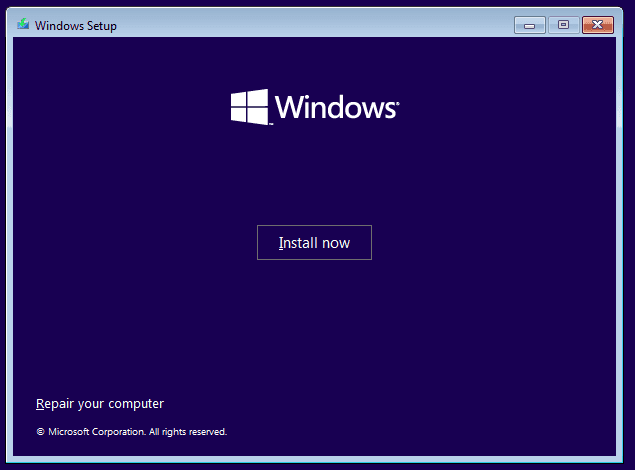
Accept Terms and License.
Select Custom Install.
Select New > Apply > OK > Next
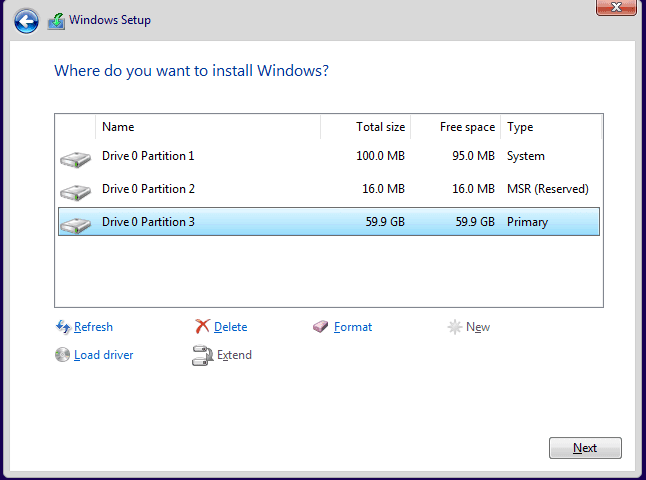
Continue with Installation. Select "I don't have internet".
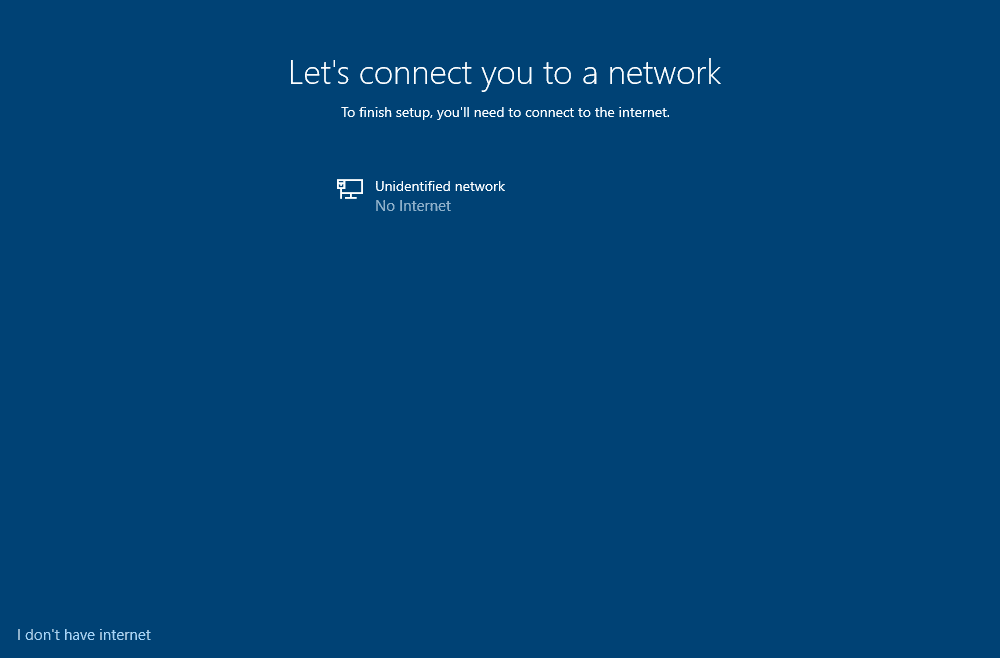
Continue with Limited Setup.
Set the user as the same one you used for DC.
Set security answers
Uncheck all the privacy settings then select Accept.
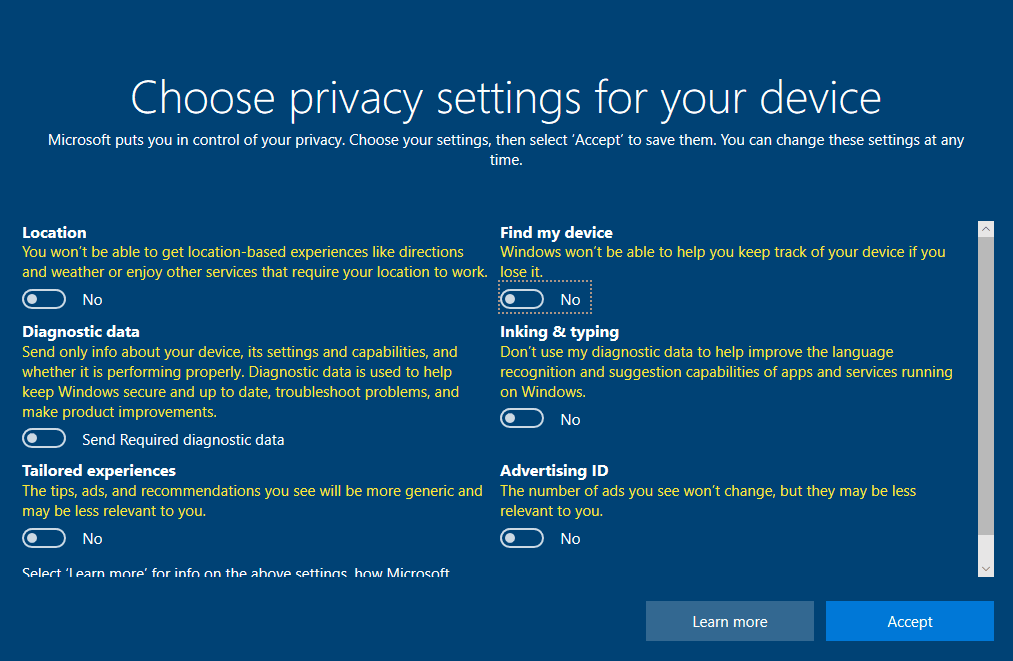
Choose "Not Now" for Cortana
Inside VMware, click Player > Manage > Install VMware tools.
Navigate to This PC > DVD Drive (D:) VMware Tools. Run the installation.
Install the Complete Version.
Reboot.
Navigate to About > Rename this PC.
Reboot.
Navigate to Network and Internet Settings > Change Adapter Options.
Right Click on Ethernet0 > Properties > Internet Protocol Version 4 (TCP/IPv4) > Use the following IP Address. Enter the following IP Addresses.
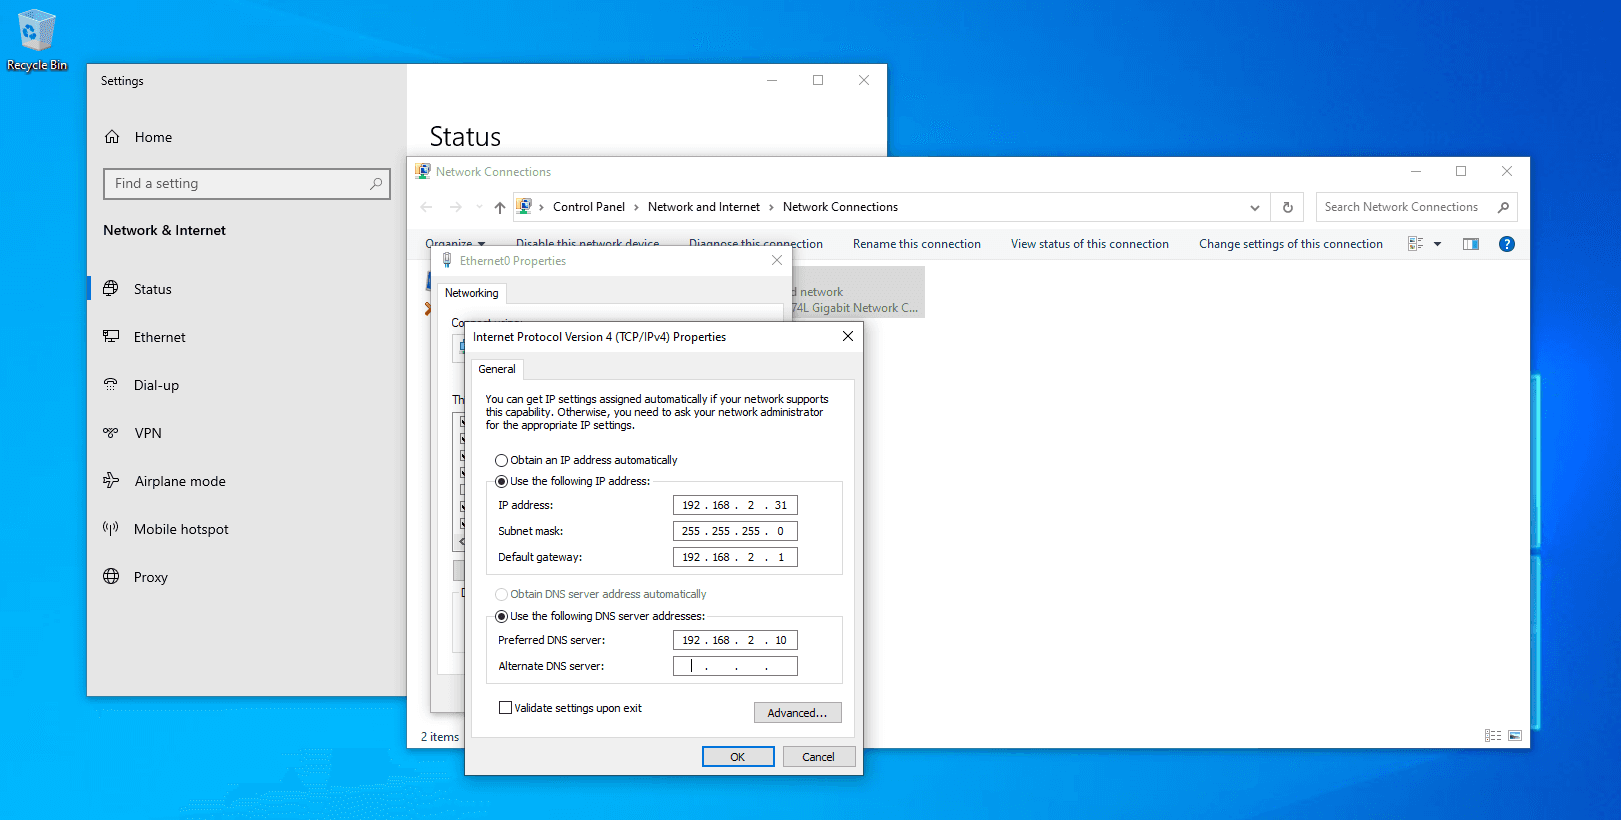
Join the PC's to the Domain:
Launch Windows Server.
Launch Command Prompt
Type ipconfig and search for your IP Address.
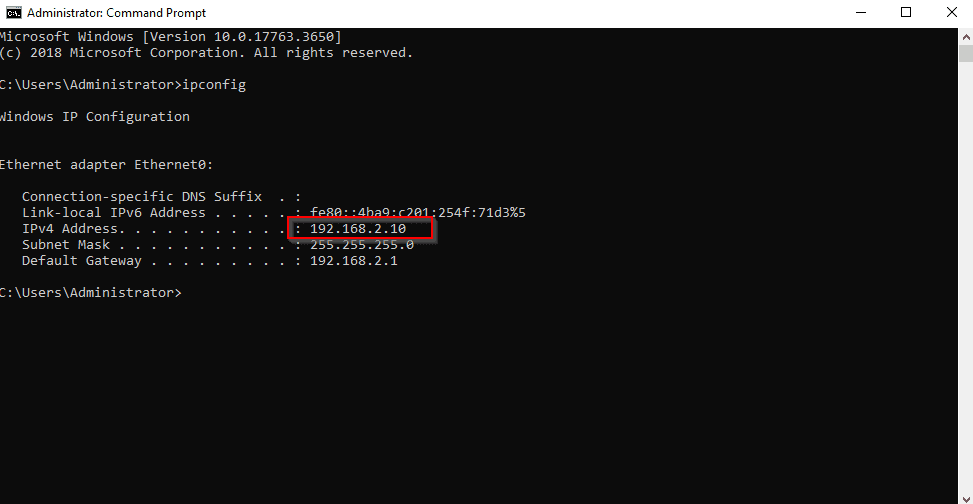
Launch Kali Linux
Login to pfSense Dashboard
Navigate to Services >DHCP Server > Victim Network
Add Windows Server IP Address to DNS servers.

Enter your domain name from your domain controller.
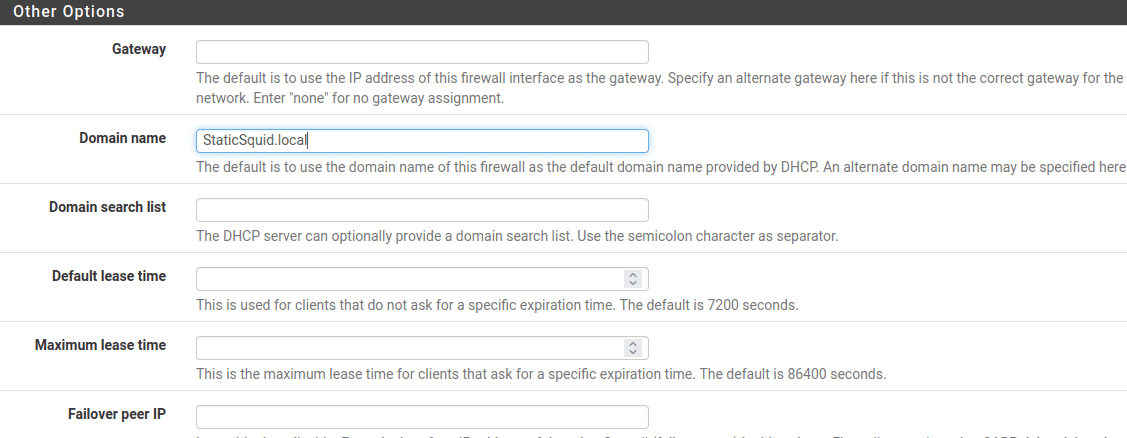
Launch Windows 10.
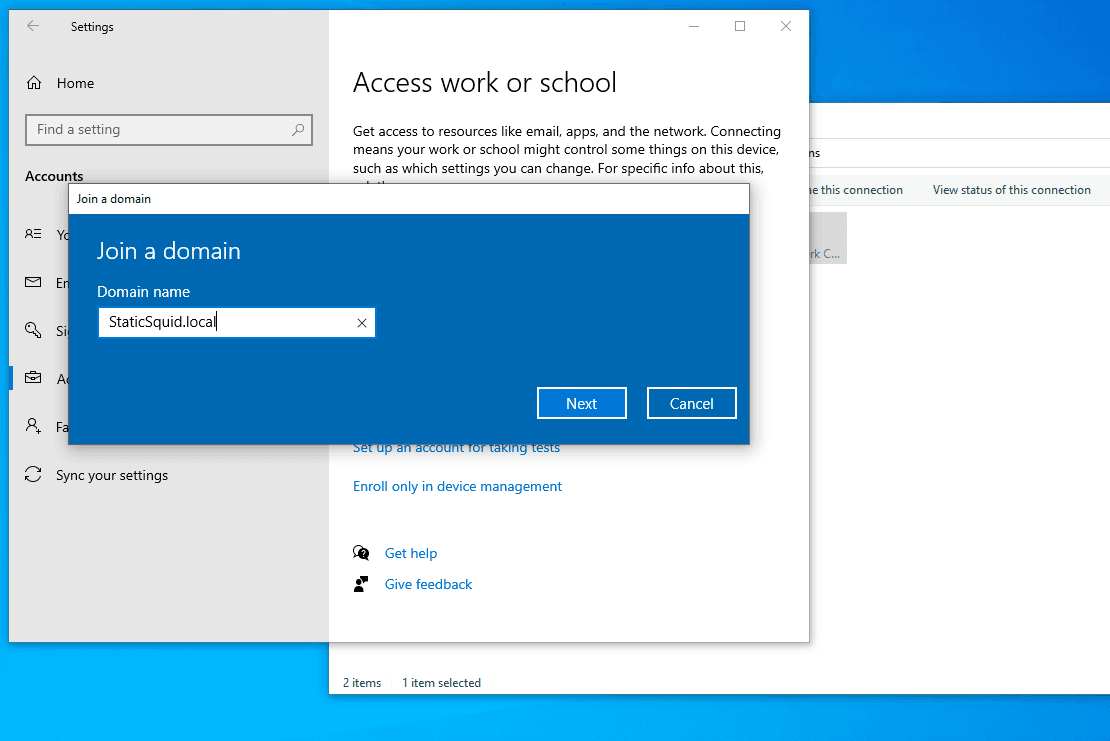
Navigate to Access work or school > Connect > Join this device to a local Active Directory domain. Add your domain.
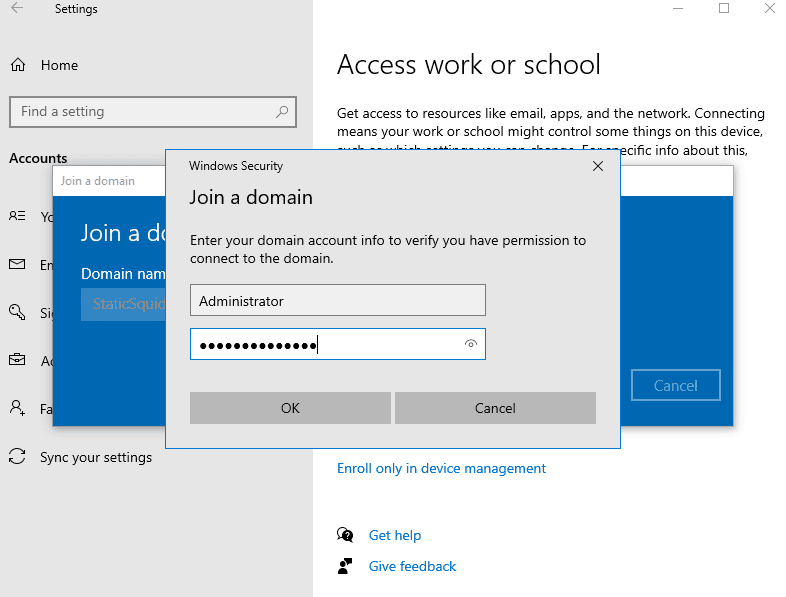
Set up account info. (Use the same password)
Skip add account.
Once finished Restart.
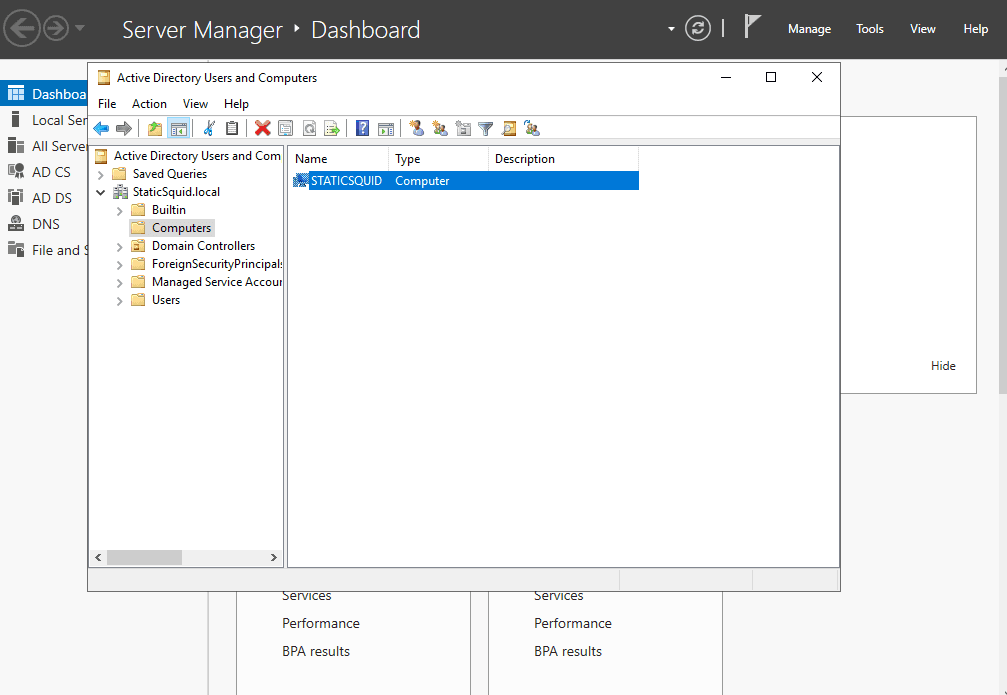
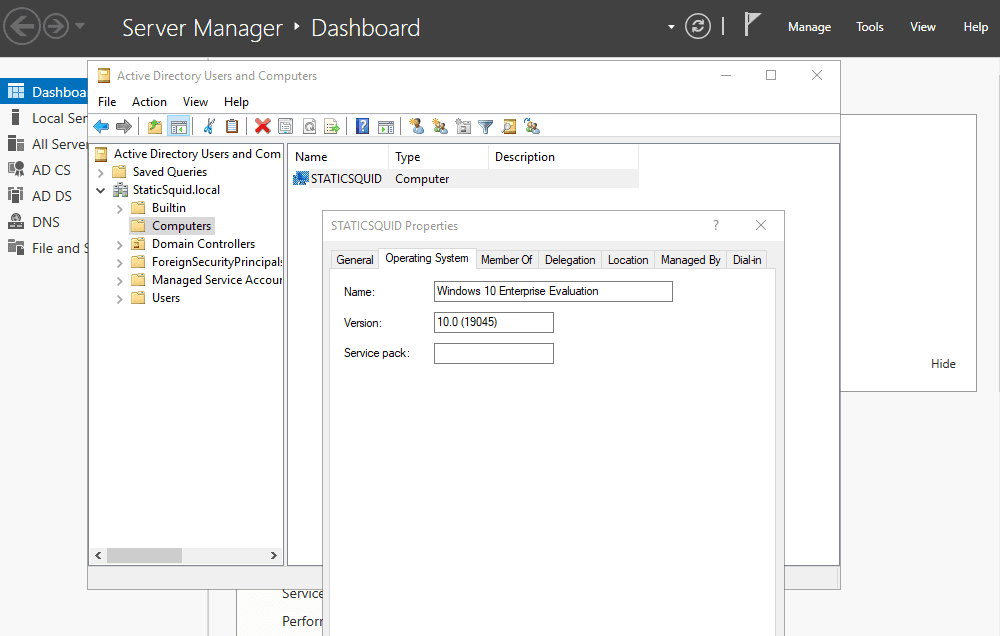
Inside Windows Server, navigate to Server Manager Dashboard > tools > Active Directory Users and Computers. Confirm that you have added your computer.
Configuring Splunk on Ubuntu Server
Setting up Splunk within a VMware virtual machine is an important step in creating a cybersecurity environment that's both robust and flexible. Splunk helps analyze large amounts of data, such as security logs, making it a vital tool for security monitoring. By configuring Splunk in VMware, you're creating a controlled space where it can run without affecting other parts of your computer system. This approach allows for more focused monitoring, efficient use of resources, and easier scalability as your needs grow. It's a balanced solution that meets the demands of both novice users and seasoned professionals, providing a streamlined path to enhanced cybersecurity monitoring. We will be using an Ubuntu Server for our Splunk instance.
Download Ubuntu Server here. (Manual Server Installation)
Launch VMware.
Create a New Virtual Machine.
Select the path to your Ubuntu Server.
Name your virtual machine.
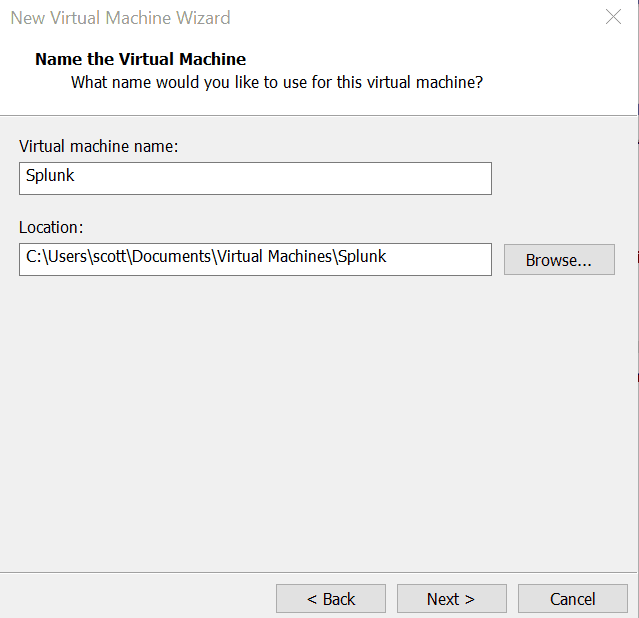
Select 100GB disk space and store single file.
Click Customize Hardware.
Click Add Network Adapter. Custom to VMnet6. Remove USB controller, sound card, and printer. Click Close.
Click Finish.
Launch Ubuntu Server.
Enter Language.
Click Enter for Network.
Click Enter for no proxy.
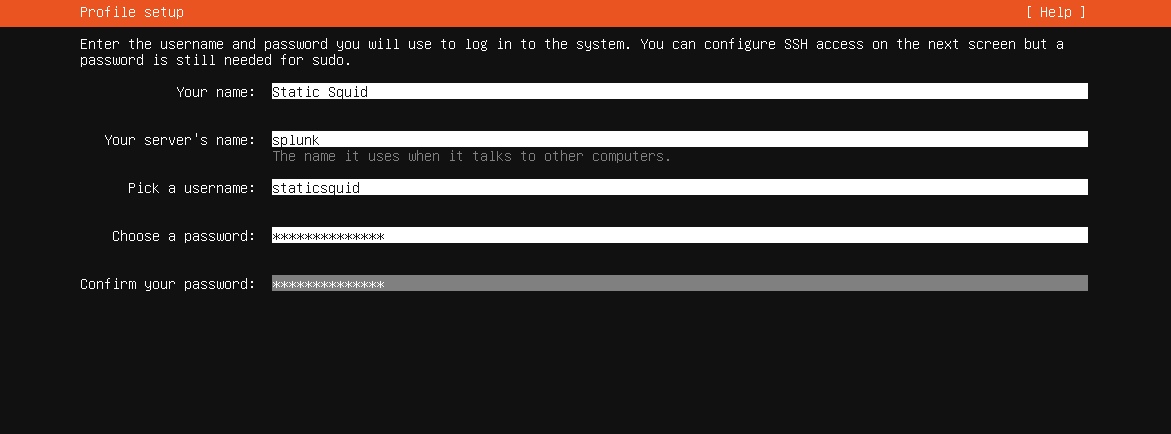
Click Enter for guided storage configuration, use an entire disk.
Click Enter for file system summary.
Click to Continue.
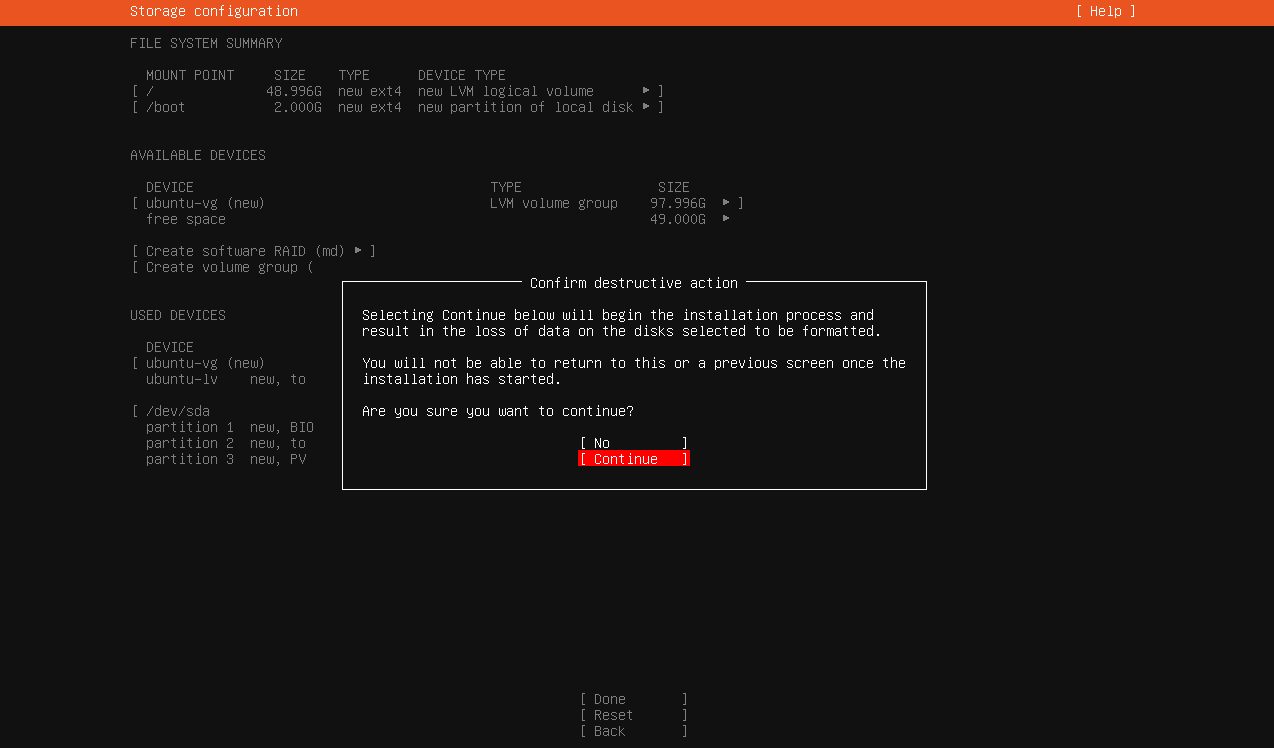
Enter your profile setup.
Install OpenSSH Server. Make sure it is checked.
Select your server snaps.
Click Done to start installation.
Reboot.
Login with your credentials.
Type in sudo apt install tasksel. Enter your password. Type y for yes.
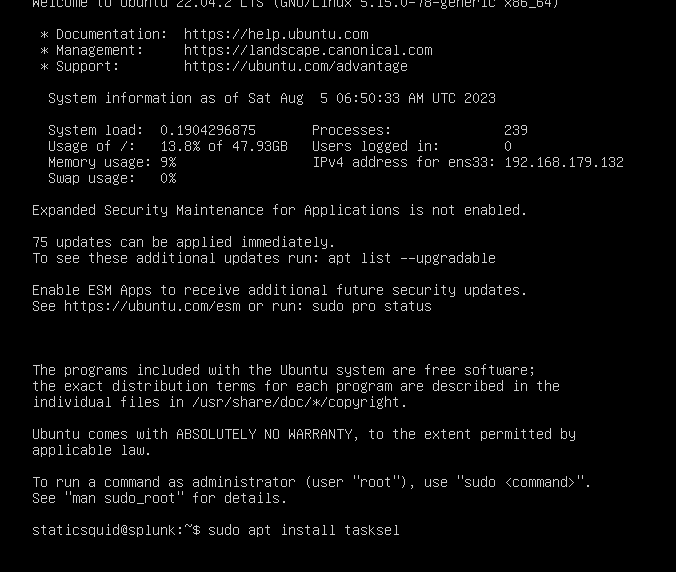
Type sudo apt install ubuntu-desktop
Reboot.
Launch Firefox or your web browser of choice.
Go to the Splunk website.
Click on Free Splunk.
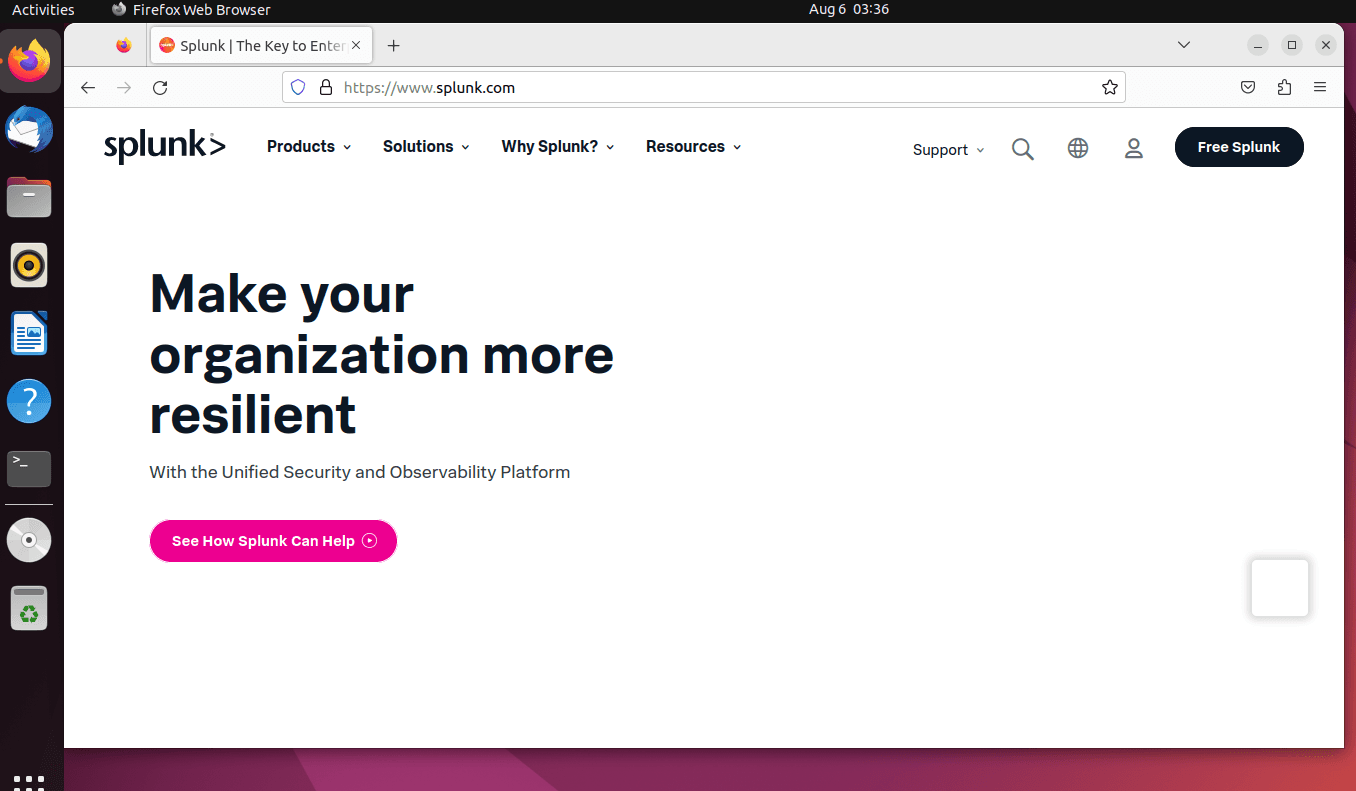
Create a free account.
Login with your credentials.
Navigate to Splunk Enterprise and Choose Free Trial.
Download the Linux .tgz version.
Launch Terminal.
Type cd Downloads/ then ls to list the contents of your downloads folder.
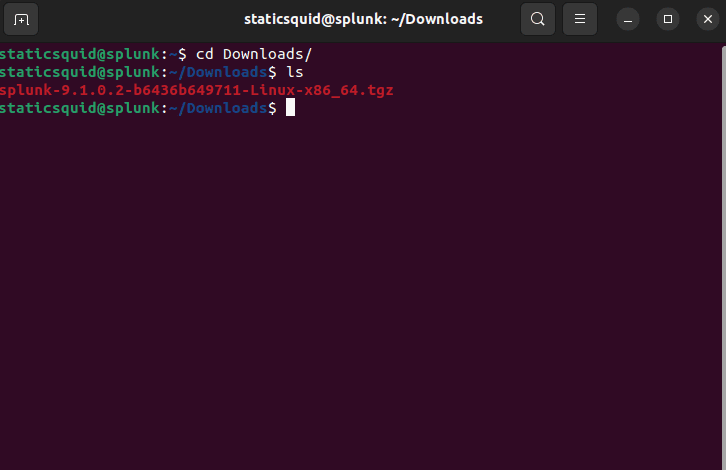
Type tar xvzf and your splunk file.
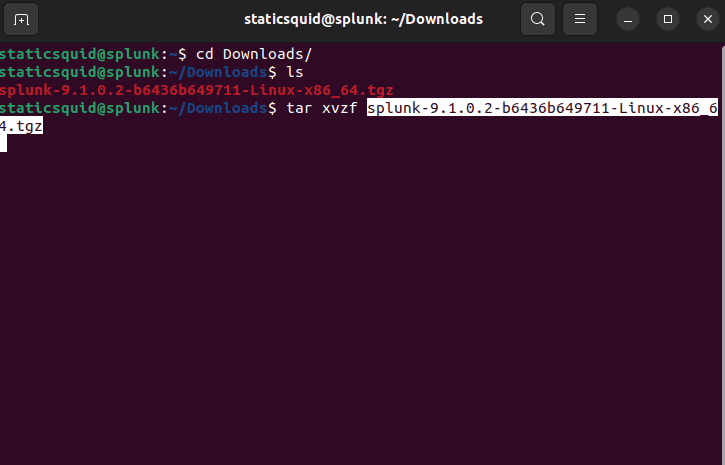
Type ls
Type cd splunk
Type ls
Type cd bin
Type ./splunk start
Scroll down and click y for yes.
create an administrator account with username and password.
take note of the splunk web interface.
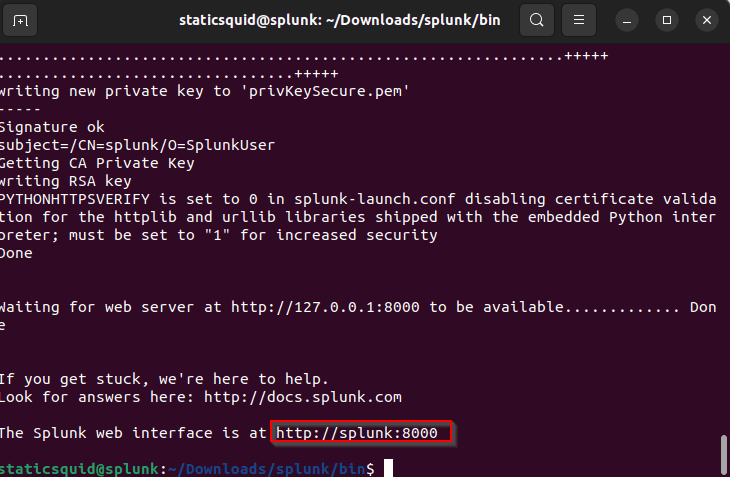
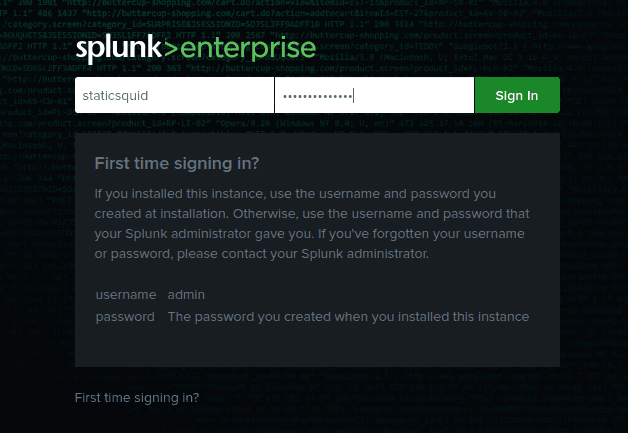
Launch your browser and enter http://splunk:8000
Login with your credentials.
Installing a Universal Forwarder
Launch your Ubuntu VM and go to your splunk web interface.
Navigate to settings > forwarding and receiving > configure receiving.
Click New Receiving Port.
Type 9997 on Listen on this port, which is the universal forwarder for splunk. Click Save.
Navigate to settings > indexes > New Index.
Name your index log wineventlog. Click Save.
Launch Windows Server 2019.
Open internet explorer.
Go to tools > internet options > security tab > Custom level > Downloads > Enable.
Before going to the next step, we have to create a new firewall rule to allow internet in your domain controller. Go to your pfSense web interface > firewall > rules > DC (victimnetwork) > add with down arrow > change protocol to any. Save and Apply Changes.
In your Windows Server 2019 VM, download and install google chrome.
Launch google chrome.
Install Splunk Universal Forwarder.
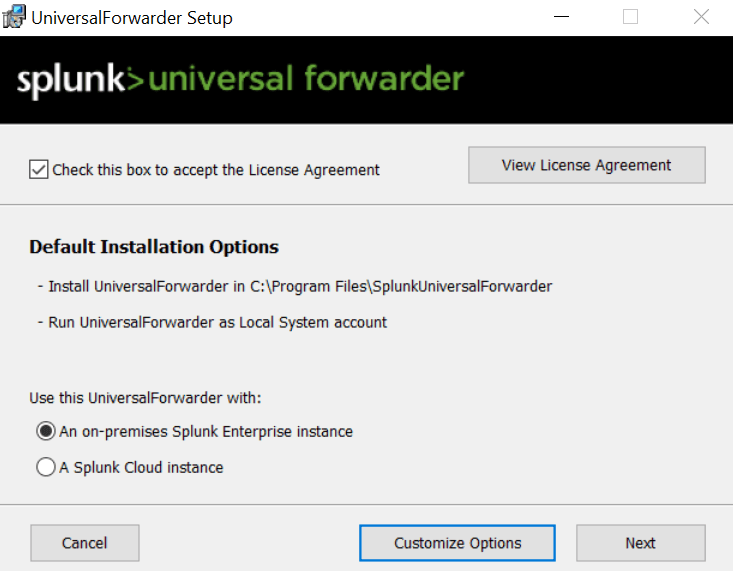
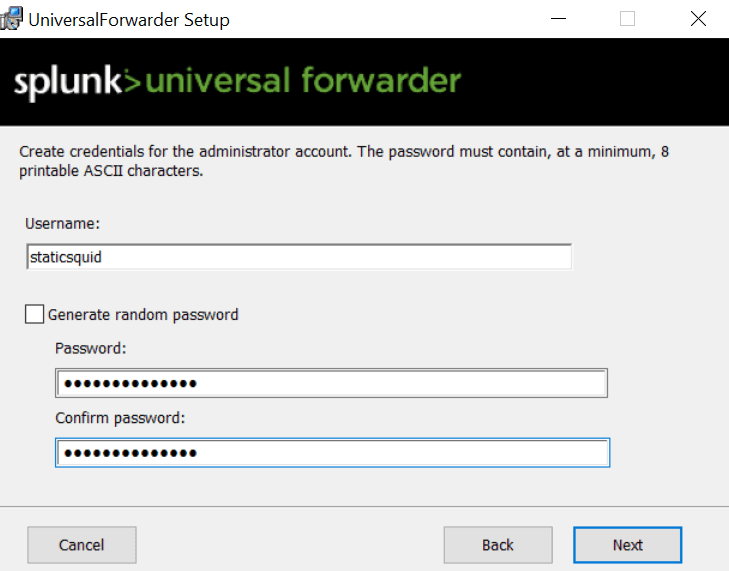
Get your IP address from splunk instance in terminal by typing ifconfig.
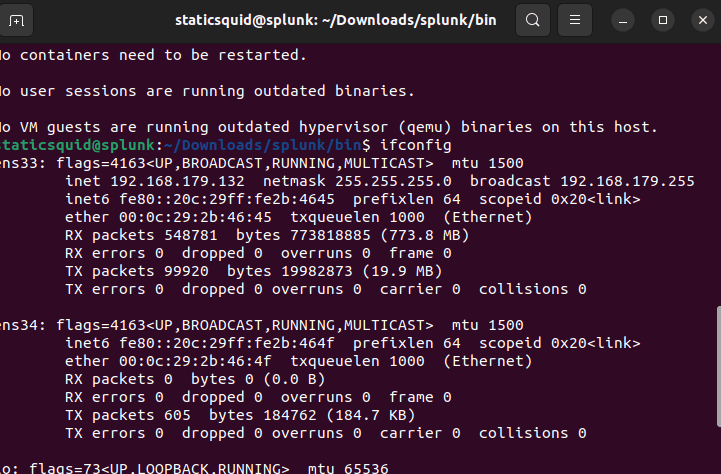
Use your splunk IP address.

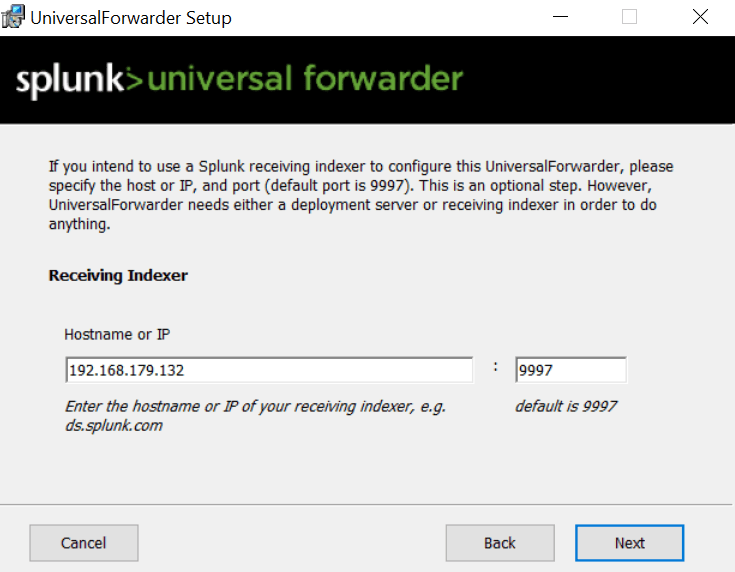
Click install.
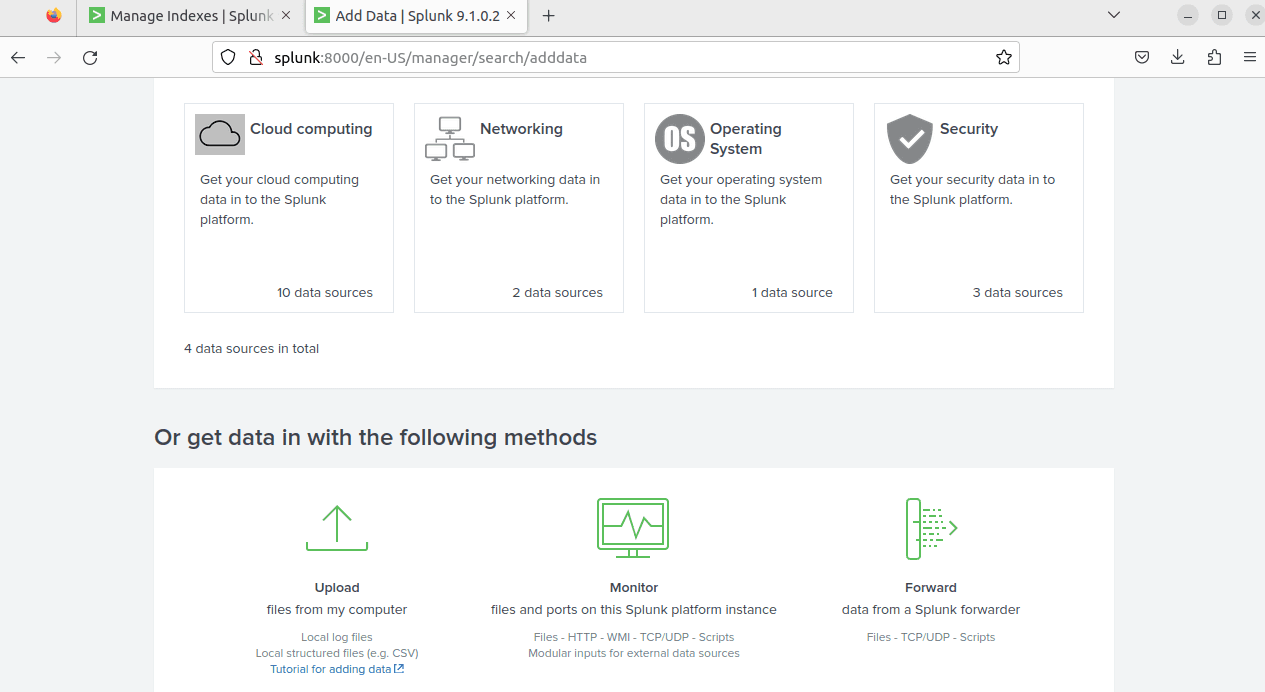
Navigate to your splunk instance > settings > Add data > Forward.
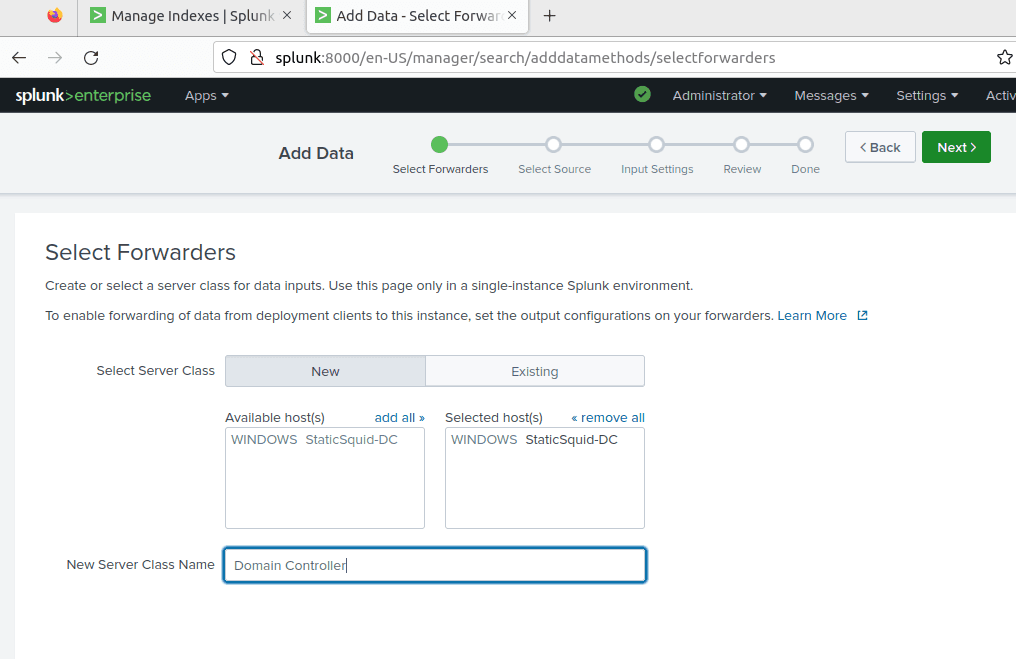
Click on your domain controller and name your domain controller. Click Next.
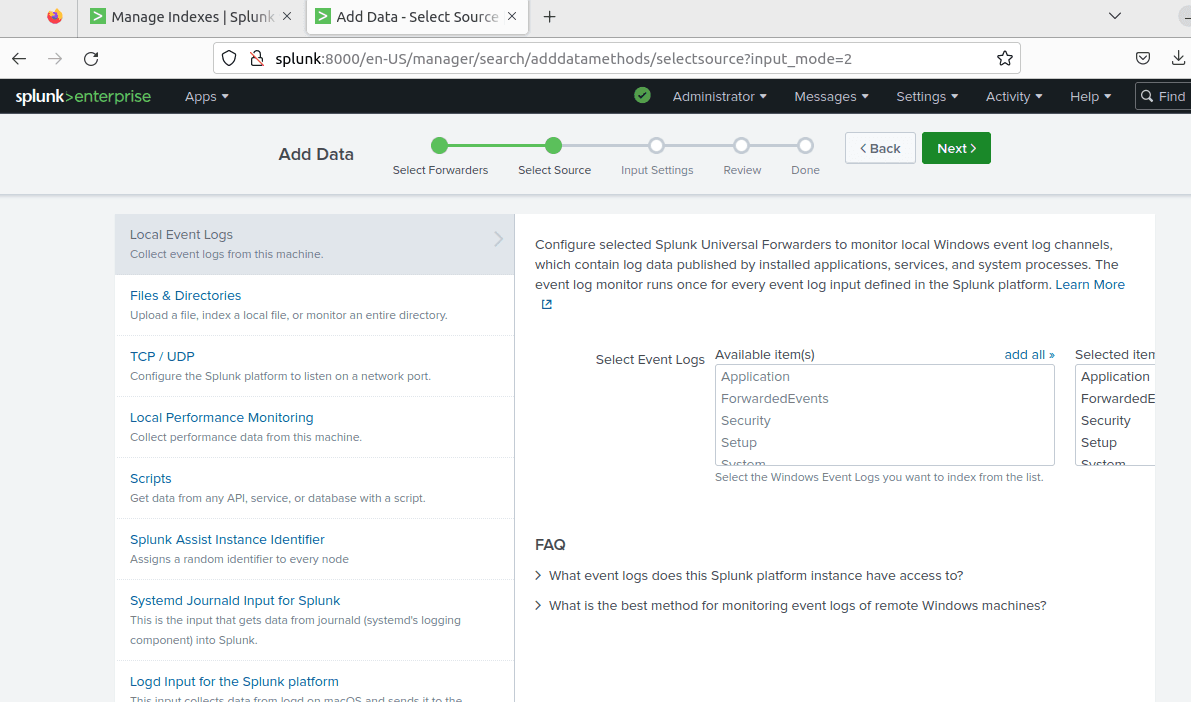
Navigate to Local Event Logs and select all of the event logs. Click Next.
Choose wineventlog in index.
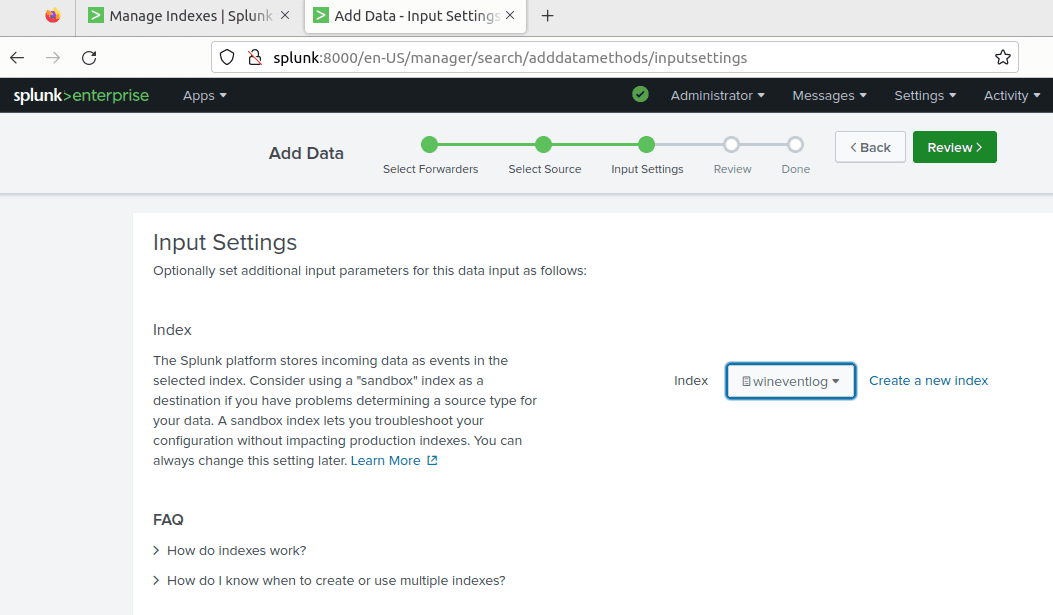
Click Review and Submit.
You can now view all your logs in splunk.
Conclusion
We began by building our Host PC, which served as the foundation for all our operations. We set up VMware Workstation as our Hypervisor, allowing us to run multiple virtual machines simultaneously on a single system.
Next, we configured a pfSense Firewall, a crucial security measure that helped us divide our network into segments and maintain strict security controls over them. Following this, we installed Security Onion, our comprehensive solution for intrusion detection, security monitoring, and log management.
We also prepared Kali Linux, a potent tool designed for conducting penetration testing and security audits. Meanwhile, our Windows Server was established as a Domain Controller, managing user interactions and access to shared resources within our network.
In addition to these, we set up Windows-based desktops and configured Splunk, a platform that enabled us to search, monitor, and analyze machine-generated data from websites, applications, servers, and mobile devices.
Finally, we set up a universal forwarder in splunk. Using a Universal Forwarder in Splunk is crucial for your cybersecurity homelab. It's like a helper that grabs data from different areas of your lab such as firewalls or servers, and sends it to Splunk. This lets you check your network's safety by reviewing the collected data. It's like having a security camera feed for your digital network. Using it transforms your homelab into a real-world cybersecurity practice field, aiding you in spotting and fixing security problems.
The lab is all yours now. You've got everything you need to do lots of experiments, research, and more. Try making detection rules, managing your SIEM, adjusting rules, and coming up with attack scenarios. This way, you can learn from many different angles.
Tips: Snapshots
Think of a VM snapshot like a time machine for your virtual computer. When you take a snapshot, it saves everything on your virtual machine just as it is. This comes in handy when you're checking out malware or trying new things on your machine. If something goes wrong, you can just use your snapshot to go back to when everything was working fine.